Happy New Year and congrats to all the new brides that got engaged over the holidays! Any new bride needs a little swag in addition to their beautiful engagement rings to celebrate the occasion, so I made a list of some of my favorites from Etsy! Whether you are a new bride yourself or know a recently engaged lady, these gifts are both adorable and affordable, as all are under $15!
Read MoreJust Engaged
Just Engaged Attire & Accessories Under $20
What lucky ladies have said yes to their partner popping the question this season? Celebrate your new soon to be bride status with some fun clothing and accessories that shows off your engagement! From socks to tshirts, all the items on this list of affordable and adorable options are less than $20, so you can easily mix and match different options for your perfect just engaged ensemble!
Read MoreJust Engaged Feyonce DIY HTV Iron On Tank Top
This post contains affiliate links, meaning that if you click on a link I will recieve a small comission. This costs you nothing extra and I only promote products I use and love! You can read our full disclosure here
Nothing like celebrating your fiancee status than with a fun tank top, so we had to include another option after creating our Engaged AF Tank Top! :)
I made the decal with Gold Confetti Glitter HTV but any color would come out great! This is an easy decal to weed and is a great beginner project if you haven’t done a lot of HTV Projects before. :)
If you already have a Cricut, this project is also much more affordable than buying one, which is always a plus!. :) You can also check out our other Tank Top Projects Here!
Supplies:
Blank Tank Tops
Easyweed Heat Transfer Vinyl or Glitter Heat Transfer Vinyl
Craft Cutter and Tool Set
Adhesive Mat
Tank Top Design Cut Files
1. After downloading the cut files, import them into the Cricut Software. After creating a new project, select Upload Image. Select the file you wish to upload and it will automatically take you to the final upload screen, where you can name the file the select Save. The SVG Files are sized so that they will automatically cut to the size you see in the photos, but if you want to change the size you can do so to fit the tank tops the way you like.
2. After selecting “Make It” Make sure to select the Mirror Mode on the cutting screen. Cut the design in your choice of heat transfer vinyl (I used White HTV) with the Iron On (for Easyweed Vinyl) or Iron On+ (for Glitter Vinyl) Setting on your Cricut, with the shiny side of the material down.
3. Weed the additional material off of the backing material so that, looking down with the shiny side up, you can see your design with the correct orientation.
4. Iron your tank top to remove any creases, then center the design over the top half of the tank top. Arrange the design shiny side up, then cover with parchment paper. Make sure to keep the parchment paper between the design and the iron.
5. Set your Iron to the second Highest setting and press the the iron down firmly on the design, not ironing but rather using it as a small heat press. I worked from the upper left to lower right on the design, pressing the iron on each part of the design for at least 30 seconds, then overlapping the last position as you move the iron across the design.
6. Remove the backing from the design, leaving the design on the tank top.
Check out our other tank top projects here!
DIY "Does this Ring Make me Look Engaged?" Stemless Wine Glass Tumblers
This post contains affiliate links, meaning that if you click on a link I will recieve a small comission. This costs you nothing extra and I only promote products I use and love! You can read our full disclosure here
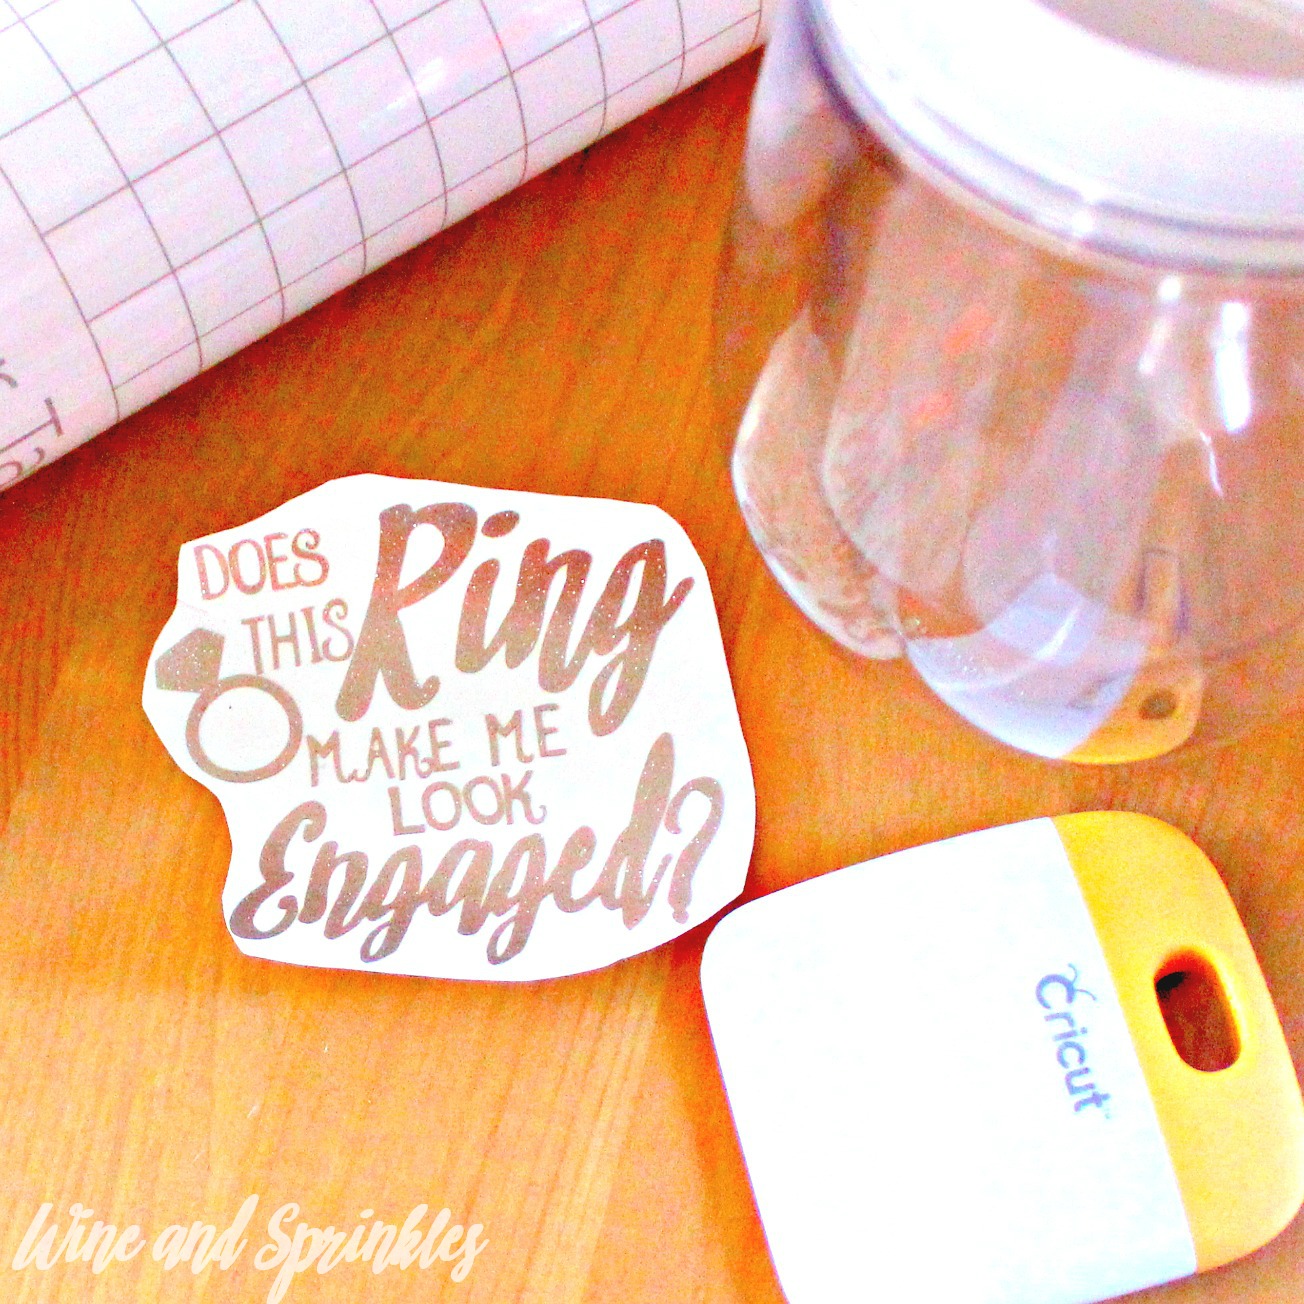
In keeping with the just engaged swag we are crafting this week, next up is this adorable stemless wine tumbler! “Does this ring make me look Engaged?” is so cute and this decal could easily be put on all sorts of glassware!
For my tumblers, I used Champagne Glitter Vinyl for the decal. The thin lines on the small text makes this one a little tougher to weed so while I used a glitter vinyl I would recommend Oracal 651 Permanent Vinyl.
Supplies:
Stemless Wine Tumbler
Permanent Adhesive Vinyl
Transfer Paper
Craft Cutter and Tool Set
Adhesive Mat
Stemless Wine Tumbler Design Cut File
1. After downloading the cut files, import them into the Cricut Software. After creating a new project, select Upload Image. Select the file you wish to upload and it will automatically take you to the final upload screen, where you can name the file the select Save.
2. Cut the design(s) in your choice of permanent adhesive vinyl with the Vinyl Setting on your Cricut. The SVG Files are sized so that they will automatically cut to the size you see in the photos, but if you want to change the size you can. :)
3. Once the designs are cut, weed away the extra vinyl and cut a piece of transfer tape to 3" x 3.5". Cut away any excess backing from the vinyl design and smooth transfer tape over the design, aligning it along the top of the text, leaving one set of 1/2” blocks above the top of the design. Using the smoother tool, smooth the tape to the vinyl, removing any air bubbles.
4. Now, transfer the design to your tumbler. Remove the tape and lift the decal off the backing, making sure that the entire decal is transferred to the transfer tape.
5. Align the top of the transfer tape along the top lip of the tumbler and smooth down to the center of the design. Working from the center to the edge of the design, trace the letters to smooth them onto the tumbler. Because the surface is curved, focus on the vinyl smoothly transferring than your transfer tape looking nice and neat.
6. Once the design is set, remove the transfer tape from the tumbler, leaving the design on the tumbler. Use the smoother tool or your finger to resmooth the design and to remove the air bubbles.
DIY Totes Engaged HTV Iron on Tote Bags
This post contains affiliate links, meaning that if you click on a link I will recieve a small comission. This costs you nothing extra and I only promote products I use and love! You can read our full disclosure here
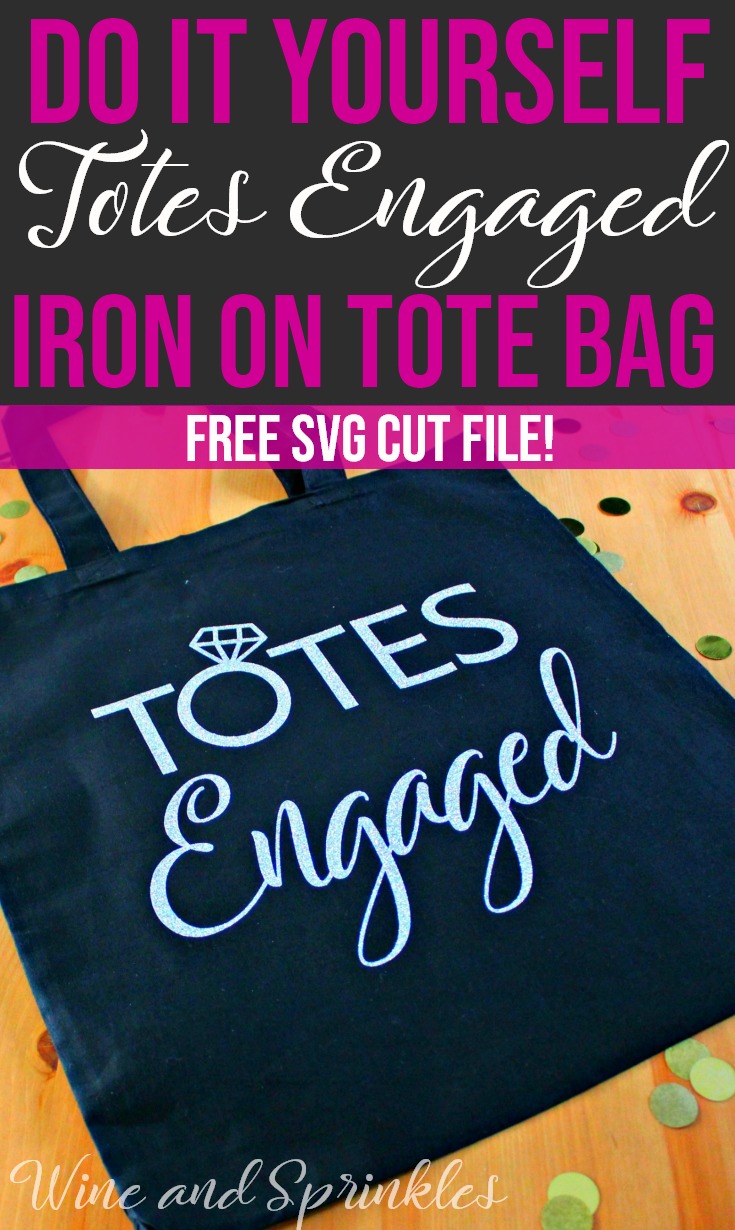
I’m so excited that one of my best friend’s recently got engaged and it’s definitely inspired a good amount of “Just Engaged” swag. This pretty and punny “Totes Engaged” Tote Bag is the perfect gift for a newly engaged bride, or to make yourself to start your wedding DIY journey off right!
I used Silver Glitter HTV for this bag, but you could easily make them any color you like! :) This is a great project to begin with as it’s easy to weed and is almost square in shape, so it can easily be resized to fit pockets on other tote bags.
Supplies:
Blank Tote Bags
Easyweed Heat Transfer Vinyl or Glitter Heat Transfer Vinyl
Craft Cutter and Tool Set
Adhesive Mat
Tote Bag Design Cut Files
1. After downloading the cut files, import them into the Cricut Software. After creating a new project, select Upload Image. Select the file you wish to upload and it will automatically take you to the final upload screen, where you can name the file the select Save. The SVG Files are sized so that they will automatically cut to the size you see in the photos, but if you want to change the size you can do so to fit the tote bags the way you like.
2. After selecting “Make It” Make sure to select the Mirror Mode on the cutting screen. Cut the design(s) in your choice of heat transfer vinyl with the Iron On (for Easyweed Vinyl) or Iron On+ (for Glitter Vinyl) Setting on your Cricut, with the shiny side of the material down.
3. Weed the additional material off of the backing material so that, looking down with the shiny side up, you can see your design with the correct orientation.
4. Iron your tote bag to remove any creases, then center the design in the middle of the tote. Arrange the design shiny side up, then cover with parchment paper. Make sure to keep the parchment paper between the design and the iron.
5. Set your Iron to the second Highest setting and press the the iron down firmly on the design, not ironing but rather using it as a small heat press. I worked from the upper left to lower right on the design, pressing the iron on each part of the design for at least 30 seconds, then overlapping the last position as you move the iron across the design.
6. Remove the backing from the design, leaving the design on the tote bag. Repeat with all the remaining tote bags.
Check out more of our Tote Bag Projects Here! :)
Future Mrs. Just Engaged Skinny Tumbler
This post contains affiliate links, meaning that if you click on a link I will recieve a small comission. This costs you nothing extra and I only promote products I use and love! You can read our full disclosure here
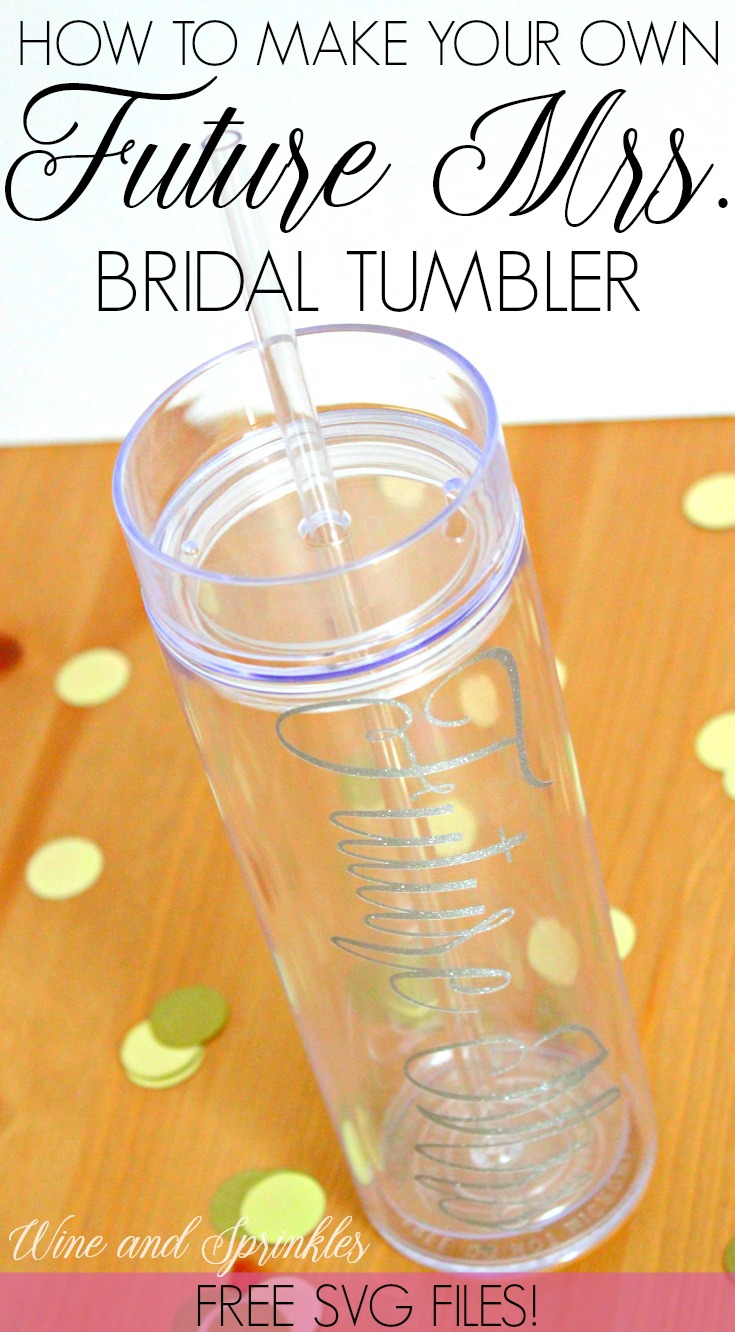
If theres’ a gift I like making for my newly engaged friends, its got to be tumblers! I’ve been having so much fun designing different decals for skinny tumblers lately, I decided to start off my tutorials for them with Just Engaged Tumbler! This “Future Mrs.” Skinny Tumbler is perfect as a work water bottle and the font is very well suited to the Glitter Permanent Vinyls.
For my tumbler, I used Silver Glitter Vinyl for the decal and I love how they turned out! While you have to be careful as far as the dot on the end of “Mrs.” this project is easy to weed and a fun first project for any new soon to be bride!
Supplies:
Skinny Tumblers
Permanent Adhesive Vinyl
Transfer Paper
Craft Cutter and Tool Set
Adhesive Mat
Skinny Tumbler Design Cut File
1. After downloading the cut files, import them into the Cricut Software. After creating a new project, select Upload Image. Select the file you wish to upload and it will automatically take you to the final upload screen, where you can name the file, then select Save.
2. Cut the design(s) in your choice of permanent adhesive vinyl with the Vinyl Setting on your Cricut. The SVG Files are sized so that they will automatically cut to the size you see in the photos, but if you want to change the size you can. :)
3. Once the designs are cut, weed away the extra vinyl and cut a piece of transfer tape to 2.5" x 7.5". Cut away any excess backing from the vinyl design and smooth transfer tape over the design, aligning it with the text and arranging it such that one set of the 1/2” blocks are along the bottom left edge of the “F",. as shown below. Using the smoother tool, smooth the tape over the vinyl, removing any air bubbles.
4. Now, transfer the design to your tumbler. Remove the tape and decal from the backing, making sure that the entire decal transfers to the transfer tape.
5. Arrange the design such that the line that you aligned to the “F” on your transfer tape is along to top edge of the lip of the tumbler, as shown below. Starting from the top and working down, trace the letters to smooth them onto the tumbler. Smooth the design to remove any air bubbles,. Remove the transfer tape from the tumbler, leaving the design on the tumbler.
6. Use the smoother tool or your finger to retrace the letters after removing the transfer tape to smooth out any additional air bubbles. Then you’re done! :)
DIY "This is my Wedding Crafting Glass" Stemless Wine Glass Tumbler
This post contains affiliate links, meaning that if you click on a link I will recieve a small comission. This costs you nothing extra and I only promote products I use and love! You can read our full disclosure here
If there’s one thing I love to do for weddings, it’s craft for them! (So surprising given all the projects on this blog ) There’s nothing like pouring yourself a glass of wine and getting down to DIY-ing all your special details, gifts and decorations for your big day! To start your DIY journey off on the right foot, I made this adorable stemless wine tumbler to be used during those fun, but sometimes stressful, wedding crafting nights!
For my tumbler, I used Oracal 651 Pink Vinyl for my decal and I love how it turned out! While I had to be careful with the scissors, the rest of the design was easy enough to weed. It’s also worth noting that, since you are transferring to a curved surface, this project is slightly more difficult on the transfer, as the glass curves the words and scissors will get a little closer together than the original weeded design. It did so with my transfer and it still turned out great, as you can see in the above photo.
Supplies:
Stemless Wine Tumblers
Permanent Adhesive Vinyl
Transfer Paper
Craft Cutter and Tool Set
Adhesive Mat
Stemless Wine Tumbler Design Cut File
1. After downloading the cut files, import them into the Cricut Software. After creating a new project, select Upload Image. Select the file you wish to upload and it will automatically take you to the final upload screen, where you can name the file the select Save.
2. Cut the design in your choice of permanent adhesive vinyl with the Vinyl Setting on your Cricut. The SVG Files are sized so that they will automatically cut to the size you see in the photos, but if you want to change the size you can. :)
3. Once the designs are cut, weed away the extra vinyl and cut a piece of transfer tape to 3.5" x 4". Cut away any excess backing from the vinyl design and smooth transfer tape over the design, aligning it along the bottom of the text. Using the smoother tool, smooth the tape to the vinyl, removing any air bubbles. The transfer tape should overlap the backing of the design, so that you can stick the tape to an object with the backing still on the design. I aligned the transfer tape along the top of the “this is my” text, with one set of 1/2” blocks above to use in aligning it to your stemless tumbler later.
4. Now, transfer the design to your tumbler. Remove the tape from the backing and directly place the design on the tumbler. Arrange the design in the middle of the tumbler about an inch from the top of the lip of the tumbler.
5. Working from the middle to the edges, top to bottom, trace the letters with your fingers to smooth the design onto the tumbler. Because the surface is curved, focus on the vinyl smoothly transferring than your transfer tape looking nice and neat. I started in the top middle of the design, then would smooth the text, lifting the transfer tape from the tumbler and design as needed but never completely removing the transfer tape so that the alignment stayed consistent. Once the design is set, remove the transfer tape from the tumbler, leaving the design on the tumbler.
6. Finally, use the smoother tool or your finger to resmooth the design id needed and to remove the air bubbles, completing your new tumbler! :)
Write here…
DIY Engaged AF Bridal Tank Top
This post contains affiliate links, meaning that if you click on a link I will recieve a small comission. This costs you nothing extra and I only promote products I use and love! You can read our full disclosure here
What better way to celebrate being engaged than with some fun wearables that you can rock throughout your wedding planning time? Its basically the only time you can wear them and if you make them yourself, they can be very inexpensive too! :) I started this year off with one of my favorite just engaged tank top sayings and it makes me wish I was engaged again and planning a wedding this year! :)
I made this tank top with Confetti Glitter HTV and loved the look of it and they have tons of different colors to choose from if this gold isn’t really your color. :) And if you have the Cricut already, this project costs less than $10! Pair it with a Wedding Planning Wine Glass or any of the Swag Under $15 we showed last week for a great just engaged vibe to get you through the fun (or stress) of wedding planning. :)
Supplies:
Blank Tank Tops
Easyweed Heat Transfer Vinyl or Glitter Heat Transfer Vinyl
Craft Cutter and Tool Set
Adhesive Mat
Tank Top Design Cut Files
1. After downloading the cut files, import them into the Cricut Software. After creating a new project, select Upload Image. Select the file you wish to upload and it will automatically take you to the final upload screen, where you can name the file the select Save. The SVG Files are sized so that they will automatically cut to the size you see in the photos, but if you want to change the size you can do so to fit the tank tops the way you like.
2. After selecting “Make It” Make sure to select the Mirror Mode on the cutting screen. Cut the design in your choice of heat transfer vinyl (I used Gold Confetti Glitter HTV) with the Iron On (for Easyweed Vinyl) or Iron On+ (for Glitter Vinyl) Setting on your Cricut, with the shiny side of the material down.
3. Weed the additional material off of the backing material so that, looking down with the shiny side up, you can see your design with the correct orientation.
4. Iron your tank top to remove any creases, then center the design over the top half of the tank top. Arrange the design shiny side up, then cover with parchment paper. Make sure to keep the parchment paper between the design and the iron.
5. Set your Iron to the second Highest setting and press the the iron down firmly on the design, not ironing but rather using it as a small heat press. I worked from the upper left to lower right on the design, pressing the iron on each part of the design for at least 30 seconds, then overlapping the last position as you move the iron across the design.
6. Remove the backing from the design, leaving the design on the tank top.
This is a great project to start your journey into DIY wedding crafting, its easy to weed, a good size for a tank top but can be easily ironed on with just a few ironed “presses” to finish it up and not a lot of small or thin lines that could pull up if you didn’t iron it long enough. If you are ready to try more tank tops, check out our other tank top projects here!
DIY Wedding Planning Wine Glass
This post contains affiliate links, meaning that if you click on a link I will recieve a small comission. This costs you nothing extra and I only promote products I use and love! You can read our full disclosure here
Happy New Year and congratulations to all the new future brides that got engaged over the holiday season! :) What better way than to celebrate and help you get through the wedding planning process than a lovely diy wine glass!
I made one in a Champagne Glitter Vinyl and another in a Turquoise Vinyl, but if you are new to weeding small vinyl designs I would recommend not using the glitter vinyl. In addition, its easiest to smooth the design from the middle to the top, then middle to the bottom to deal with the curvature of the glass.
1. After downloading the cut files, import them into the Cricut Software. After creating a new project, select Upload Image. Select the file you wish to upload and it will automatically take you to the final upload screen, where you can name the file the select Save.
2. Cut the design(s) in your choice of permanent adhesive vinyl with the Vinyl Setting on your Cricut. The SVG Files are sized so that they will automatically cut to the size you see in the photos, but if you want to change the size you can do so to fit another sized glass than the ones we recommend. :)
3. Once the designs are cut, weed away the extra vinyl and cut a piece of transfer taper to 3" x 3.5". Cut away any excess backing from the vinyl design and smooth transfer tape over the design, aligning it to the top of the text (“this is my”). I also aligned mine so that one set of the 1/2” blocks on the transfer tape were above the text so the it was easy to align on the glass.Using the smoother tool, smooth the tape to the vinyl, removing any air bubbles.
4. Remove the transfer tape, making sure that the whole of the design transfers from the vinyl backing to the transfer tape.
5. Now, transfer the design to your glass. align the top of the transfer tape to the lip of the glass, as shown below. Smooth down the middle of the transfer tape to about the middle of the design, then smooth the design around the curve of the glass from the middle of the design to the edges. Smooth any air bubbles out of the vinyl, but don’t worry about the crinkling of the transfer tape with the curved surface.
6. Remove the transfer tape to leave the design on the glass. Any additional bubbles in the design can now be smoothed out with either your fingers or the smoother tool. The letters are small enough that I only had one to smooth and it did quite easily. :)
And now you have the perfect wine glass to help you or your new favorite bride get through the fun and stress of planning a wedding! :)