DIY Tutorials

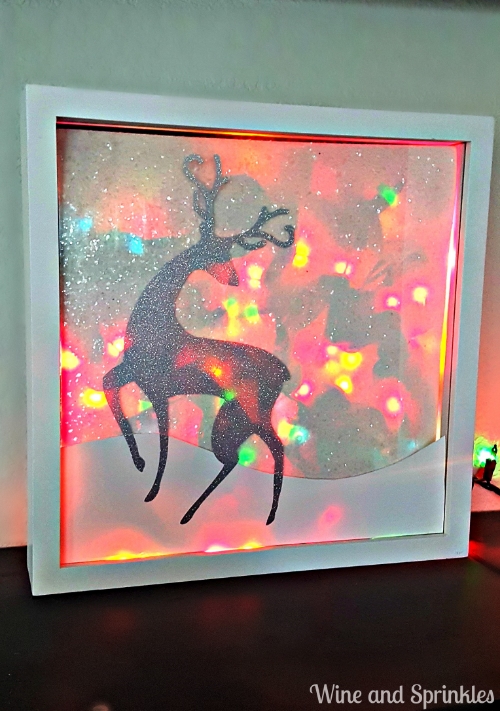
Northern Lights Shadow Box

This post contains affiliate links, meaning that if you click on a link I will recieve a small comission. This costs you nothing extra and I only promote products I use and love! You can read our full disclosure here

Northern Lights Shadow Box.jpg

This Shadow Box was one of my favorite crafts of the holiday Season! After making oodles of prints and canvases I needed just one more piece to complete my Christmas "Art Wall" and this little reindeer fit the bill. Making it was much more straightforward than I would've thought and it came out perfect.

*This post contain affiliate links. I only link products I use and love!

Supplies:

White and Silver Glitter Permanent Adhesive Vinyl (I use Expressions Vinyl)
Craft Cutter and Tool Set
Adhesive Mat
White Textured Scrapbook Paper
12 x 12 Shadow Box
Christmas Lights-Next time I will make mine with LED lights, in this case I used regular twinkle lights :)

1. First, cut out the silver vinyl into an animal/tree of your choice using either a craft cutter or exacto knife. Next cut the white vinyl in a "wave" pattern for a nice looking snowdrift. Start by adhering the white vinyl to the bottom of the shadow box then layer on your deer using transfer paper as shown below:

2. Now cut you piece of scrapbook paper to size so that it lays flat in the bottom of the shadow box. Cut of one of the bottom corners of the shadow box depending on what side you want the lights to exit. Then, arrange the lights in the shadow box (as many as you can fit) with the end of you light string going out of the shadow box on the same corner you cut from the back of the shadow box.

Cameo 3 Bundles by Expressions Vinyl

3. Replace the back of the shadow box, turn over and ta-da! The Shadow Box is complete!


My favorite part of this shadow box is that is is a nice winter print by day a a multicolored light by night, perfectly adding a little something extra to my regular Christmas Decorations. Happy Holidays to all!
Gender Reveal Cornhole: No Sew Bean Bags

I didn't quite have it in me to call these little guys sperm in the title, but they are quite possibly the cutest little sperm bean bags around. I actually got this idea from Pinterest but there were no links attached to it and the only tutorial I could find involved sewing. Seeing as I neither own a sewing machine nor am motivated enough to relearn to sew for some bean bags (especially ones that will likely only be used once) I set off to design a no sew variety that I could accomplish in a couple hours. The result turned out pretty darn cute, if I do say so myself. :)

Note: This post may contain affiliate links, where if you click the link and buy the product, I will receive a small commission. It is no extra cost to you and I only endorse products I use and love! :)

Supplies:
8 Long White Socks (try to find them without colored tips or noticeable heels)
Rice
Googly Eyes
Black Felt
Scissors
Fabric Glue
Red Paint and Circular Sponge Brush (If you want lips on your girls)
Cornhole Set (if you don't already have one)

1. If your socks have colored tips, start by flipping them inside out. Wrap the colored part around your finger and tie a knot, making sure all the color is above the knot.

2. Flip your socks right side out and one by one fill each with 1 to 1 1/2 cups of rice. My bean bags looked best with a rounded cup worth of rice but it varies from sock to sock. Tie another knot with the "tail" of the sock and tighten the knot against the base of the bean bag.

3. Next, cut the sperm tail from the extra fabric on the end of the sock. Cut from the end of the sock to the base of the knot in a serpentine pattern then repeat that cut again, making a sort of squiggly triangle. Cut off all excess sock. All your socks should look like the sock below (minus the eyes)

4. Once all the socks are stuffed with their tails cut I added the googly eyes and other accessories using fabric glue. For the boys I cut out black felt mustaches and the girls got black felt eyelashes. The girls didn't quite look like girls to me with just eyelashes so I added lips with red paint and a round sponge brush. 

They were a hit at the party and everyone had fun choosing sides! The eyelashes and mustaches actually stayed on through the whole party which was a pleasant surprise. Leave any questions in the comments!