For a foodie favor with British flair, there’s nothing like a spot of tea for going with your morning scones! When I was creating my Tea and Scones Breakfast Boxes for Vintage Victorian Cocktail Party, I began knowing I wanted to include loose tea but what was missing was a pretty and not too pricey way to pack it! So with the help of my printer and trusty craft cutter, I took to designing a festive favor bag that could be used for everyone’s favorite flavor, and these Spot of Tea Favor Bags came to be!
Read MoreFavors
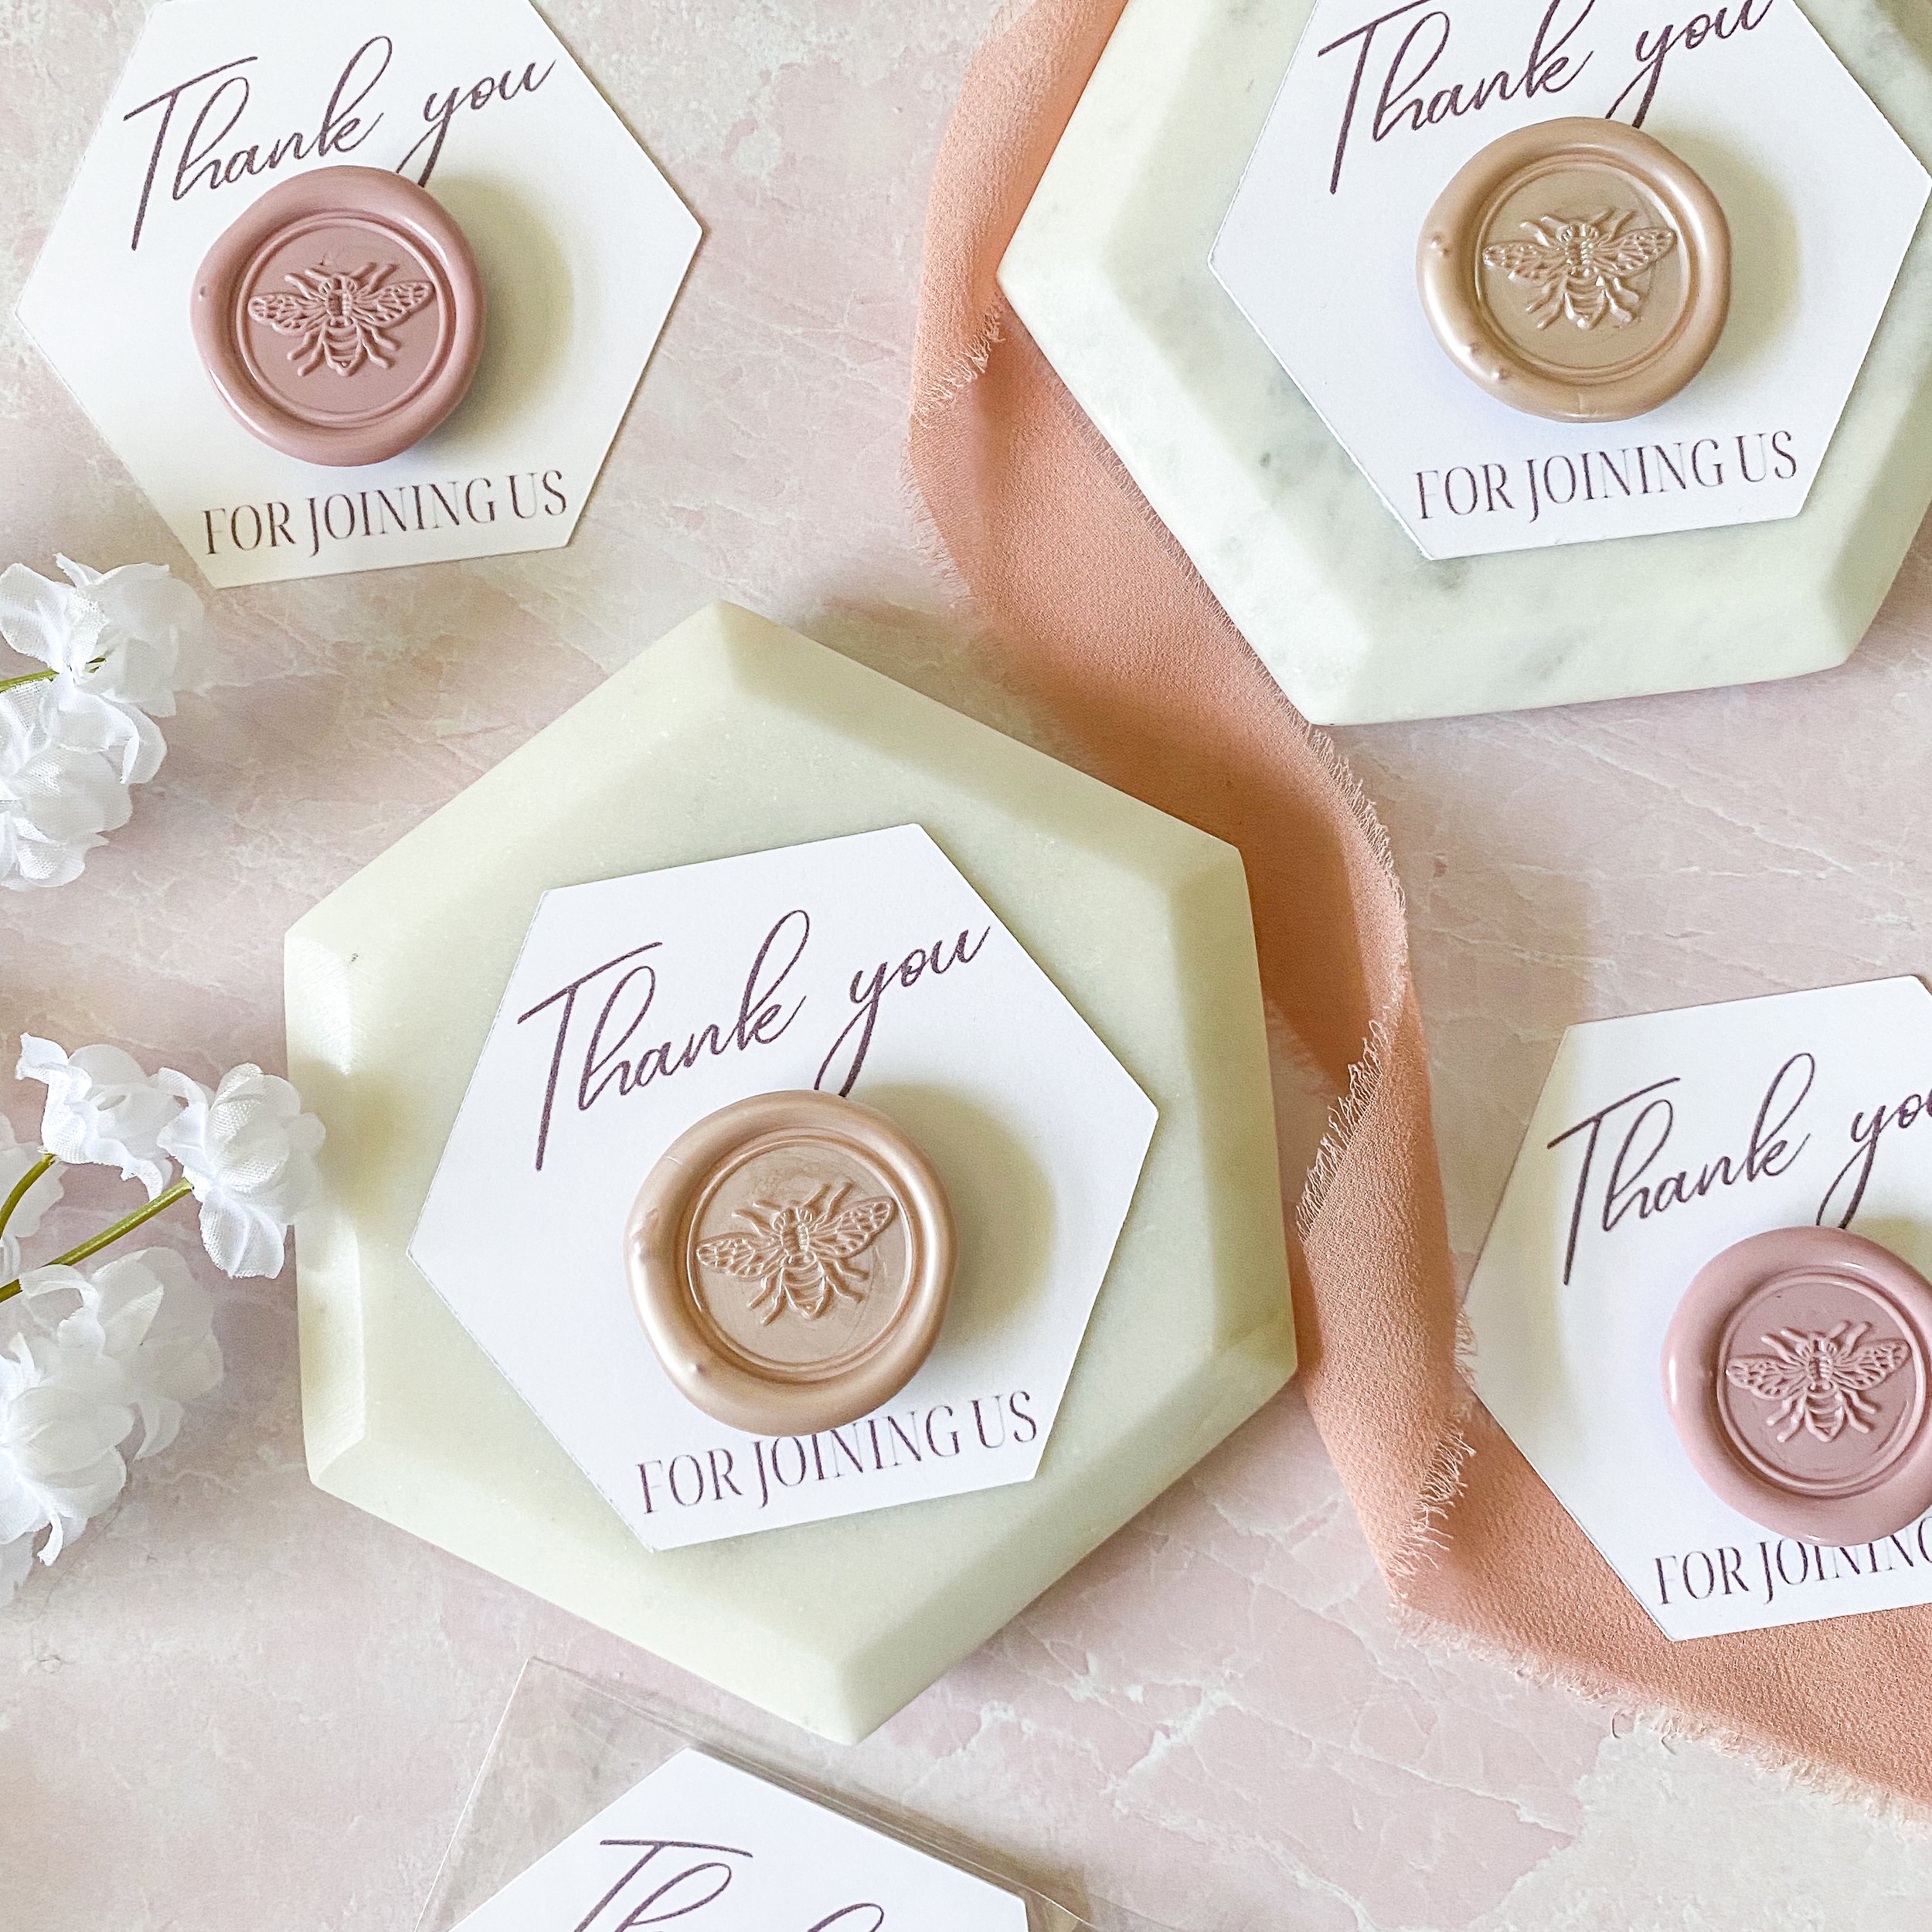
DIY Wax Seal Magnet Favors
I love magnets as an inexpensive and useful party favor, but even more for how many creative options I’ve found in the past. From wooden magnets to photos to wine corks or bottle caps, there’s so many creative ways to design them and make them unique to your own event! When I was experimenting with ways to use sealing wax in my party projects for my Vintage Victorian Cocktail Party, as soon as I thought of making these Wax Seal Magnet Favors, I knew that they were going to be my favorite form of magnet yet!
Read MoreDIY Ribbon Tied Honey Stick Favors
For sweetening your tea or enjoying as a farmer’s market treat, honey sticks are one of my favorite old school snacks, in fact my man buys me a couple anytime he sees them for sale! So when I was making Tea and Scones Breakfast Boxes to give away at my Vintage Victorian Cocktail Party, I knew that they just had to have some Ribbon Tied Honey Stick Favors!
Read MoreDIY Wax Stamp Floral Patterned Playing Cards
While I was creating all sorts of mismatched floral stationery and details for my latest party, I just had to share one of my favorites before the festivities started, featuring some of my own favorite things; florals and beautiful wax stamps! With my next party full of fun and games, my first project featuring all the wax seals I’ve made so far are kicking off with these Personalized Wax Stamp Floral Patterned Playing Cards.
Read MoreDIY Ombre Heart Shaped Mini Soap Favors
If there's a favor I love to give for baby or bridal showers, it has to be shower and spa themed goodies! So when I was done making bath bombs and bath salts, the next favor in my lineup had to be another of my favorite spa themed favors to give with a fun mini sized twist, these Ombre Pink Heart Shaped mini soaps!
Read MoreDIY Essential Oils Fizzy Floral Bath Salt Favors
There is nothing like a hot bath to soak away the troubles of the day, and giving fun spa themed goodies for them as favors is surely one of my favorite things! When I was done making a new set of Mini Bath Bomb Trios for my friendcation in Florida, I still had plenty of bath bomb supplies left, so I chose to vary the charm and help one of my at home besties with some favors for her teen’s spa party, these Floral Fizzy Bath Salts!
Read MoreEasy Essential Oils Mini Bath Bomb Favor Trios
I love giving away bath supplies as Bridal Shower and Baby Shower Favors, but they are great gifts for any variety of events, so I returned to this tutorial to create a new trio of bath bombs for my latest trip to the beach to visit and catch up with some college friends! This pretty trio was the perfect finishing touch to the Spa Sleepover Gift Boxes I made for each of my friends, being easy to DIY and color customize!
Read MoreBe Our Guest Macaron Box Favor Boxes
This post contains affiliate links, meaning that if you click on a link I will recieve a small comission. This costs you nothing extra and I only promote products I use and love! You can read our full disclosure here
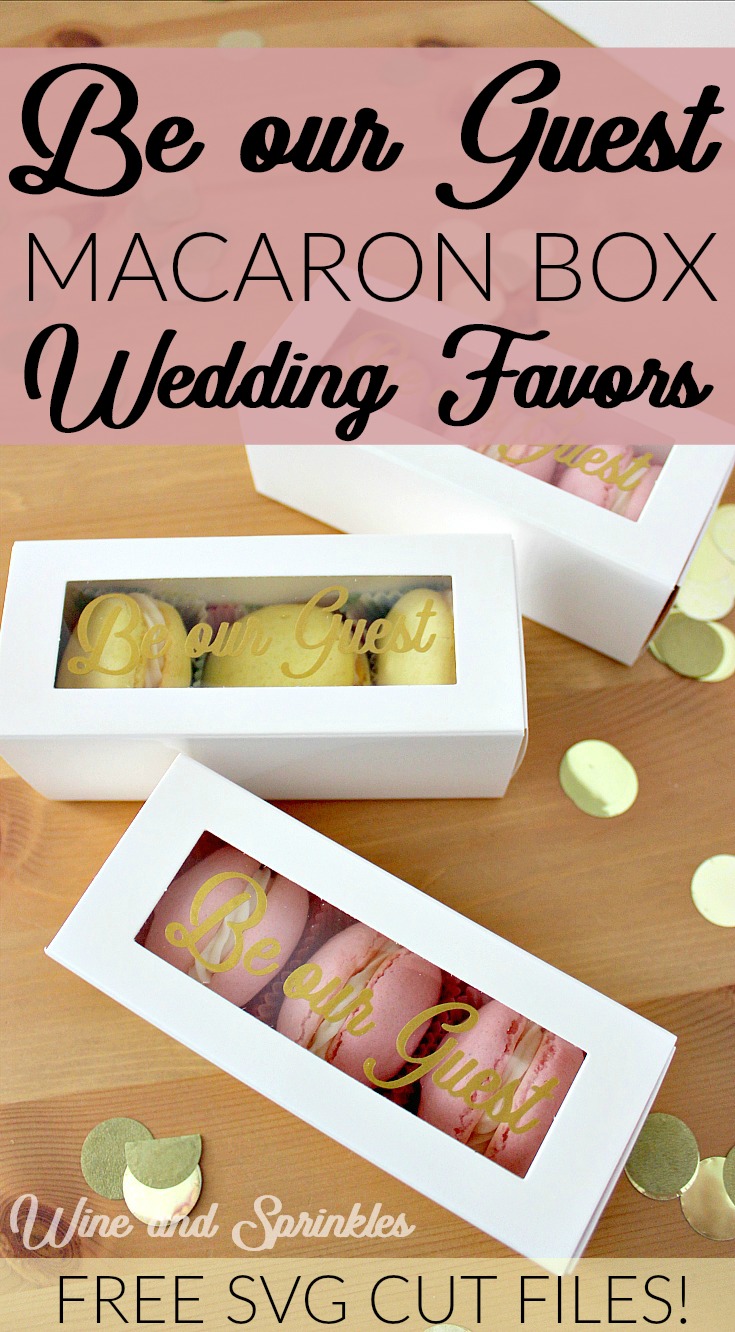
Nothing says springtime to be than macarons, and these lovely “Be our Guest” macarons have the added bonus of being an ode to my favorite fairy tale story set in France. :) These classy and whimsical wedding favors are perfect for setting at place settings for your guests to see as they sit down to dinner!
I chose Oracal 651 Gold and Silver Vinyl for my decals and made my own strawberry and lemon macarons to fill them with! While the lemon macarons were my favorite, I think I like the pink macarons with gold lettering most! :)
Supplies:
Macaroon Boxes
Transfer Tape
Craft Cutter and Tool Set
Adhesive Mat
Permanent Adhesive Vinyl
Be Our Guest Design File
1. After downloading the cut files, import them into the Cricut Software. After creating a new project, select Upload Image. Select the file you wish to upload and it will automatically take you to the final upload screen, where you can name the file the select Save.
2. Cut the design(s) in your choice of permanent adhesive vinyl with the Vinyl Setting on your Cricut. The SVG Files are sized so that they will automatically cut to the size you see in the photos, but if you want to change the size you can do so.
3. Once the designs are cut, weed away the extra vinyl and cut a piece of transfer tape to 1" x 4". Cut away any excess backing from the vinyl design and smooth transfer tape over the design, aligning along the top of the text, as shown below. Using the smoother tool, smooth the tape to the vinyl, removing any air bubbles.
4. Remove the transfer tape from the backing, lifting the design from the backing to the transfer tape.
5. Aligning the transfer tape along the bottom edge of the clear window on the sleeve of the box, place the design in the middle of the window. With the tape aligning the top, I was able to center it in the window pretty easily and its also decently forgiving if its not exactly right, as long as the top is aligned.
6. Smooth the design on the window, using your fingers to smooth each letter onto the plastic.
7. Remove the transfer tape, leaving the design on the sleeve.
With the sleeves complete, next it is time to fold the boxes that will hold the macaroons! It took me a little trial and error to get it right so I will share it here as well, since my boxes didn’t come with instructions. I did my best on the description and took lots of pictures so hopefully it will help you as well if you are having trouble! :)
Box Assembly
Since these boxes are the same as my Love is Sweet Macaron Favor Boxes, I’m using those pictures! :)
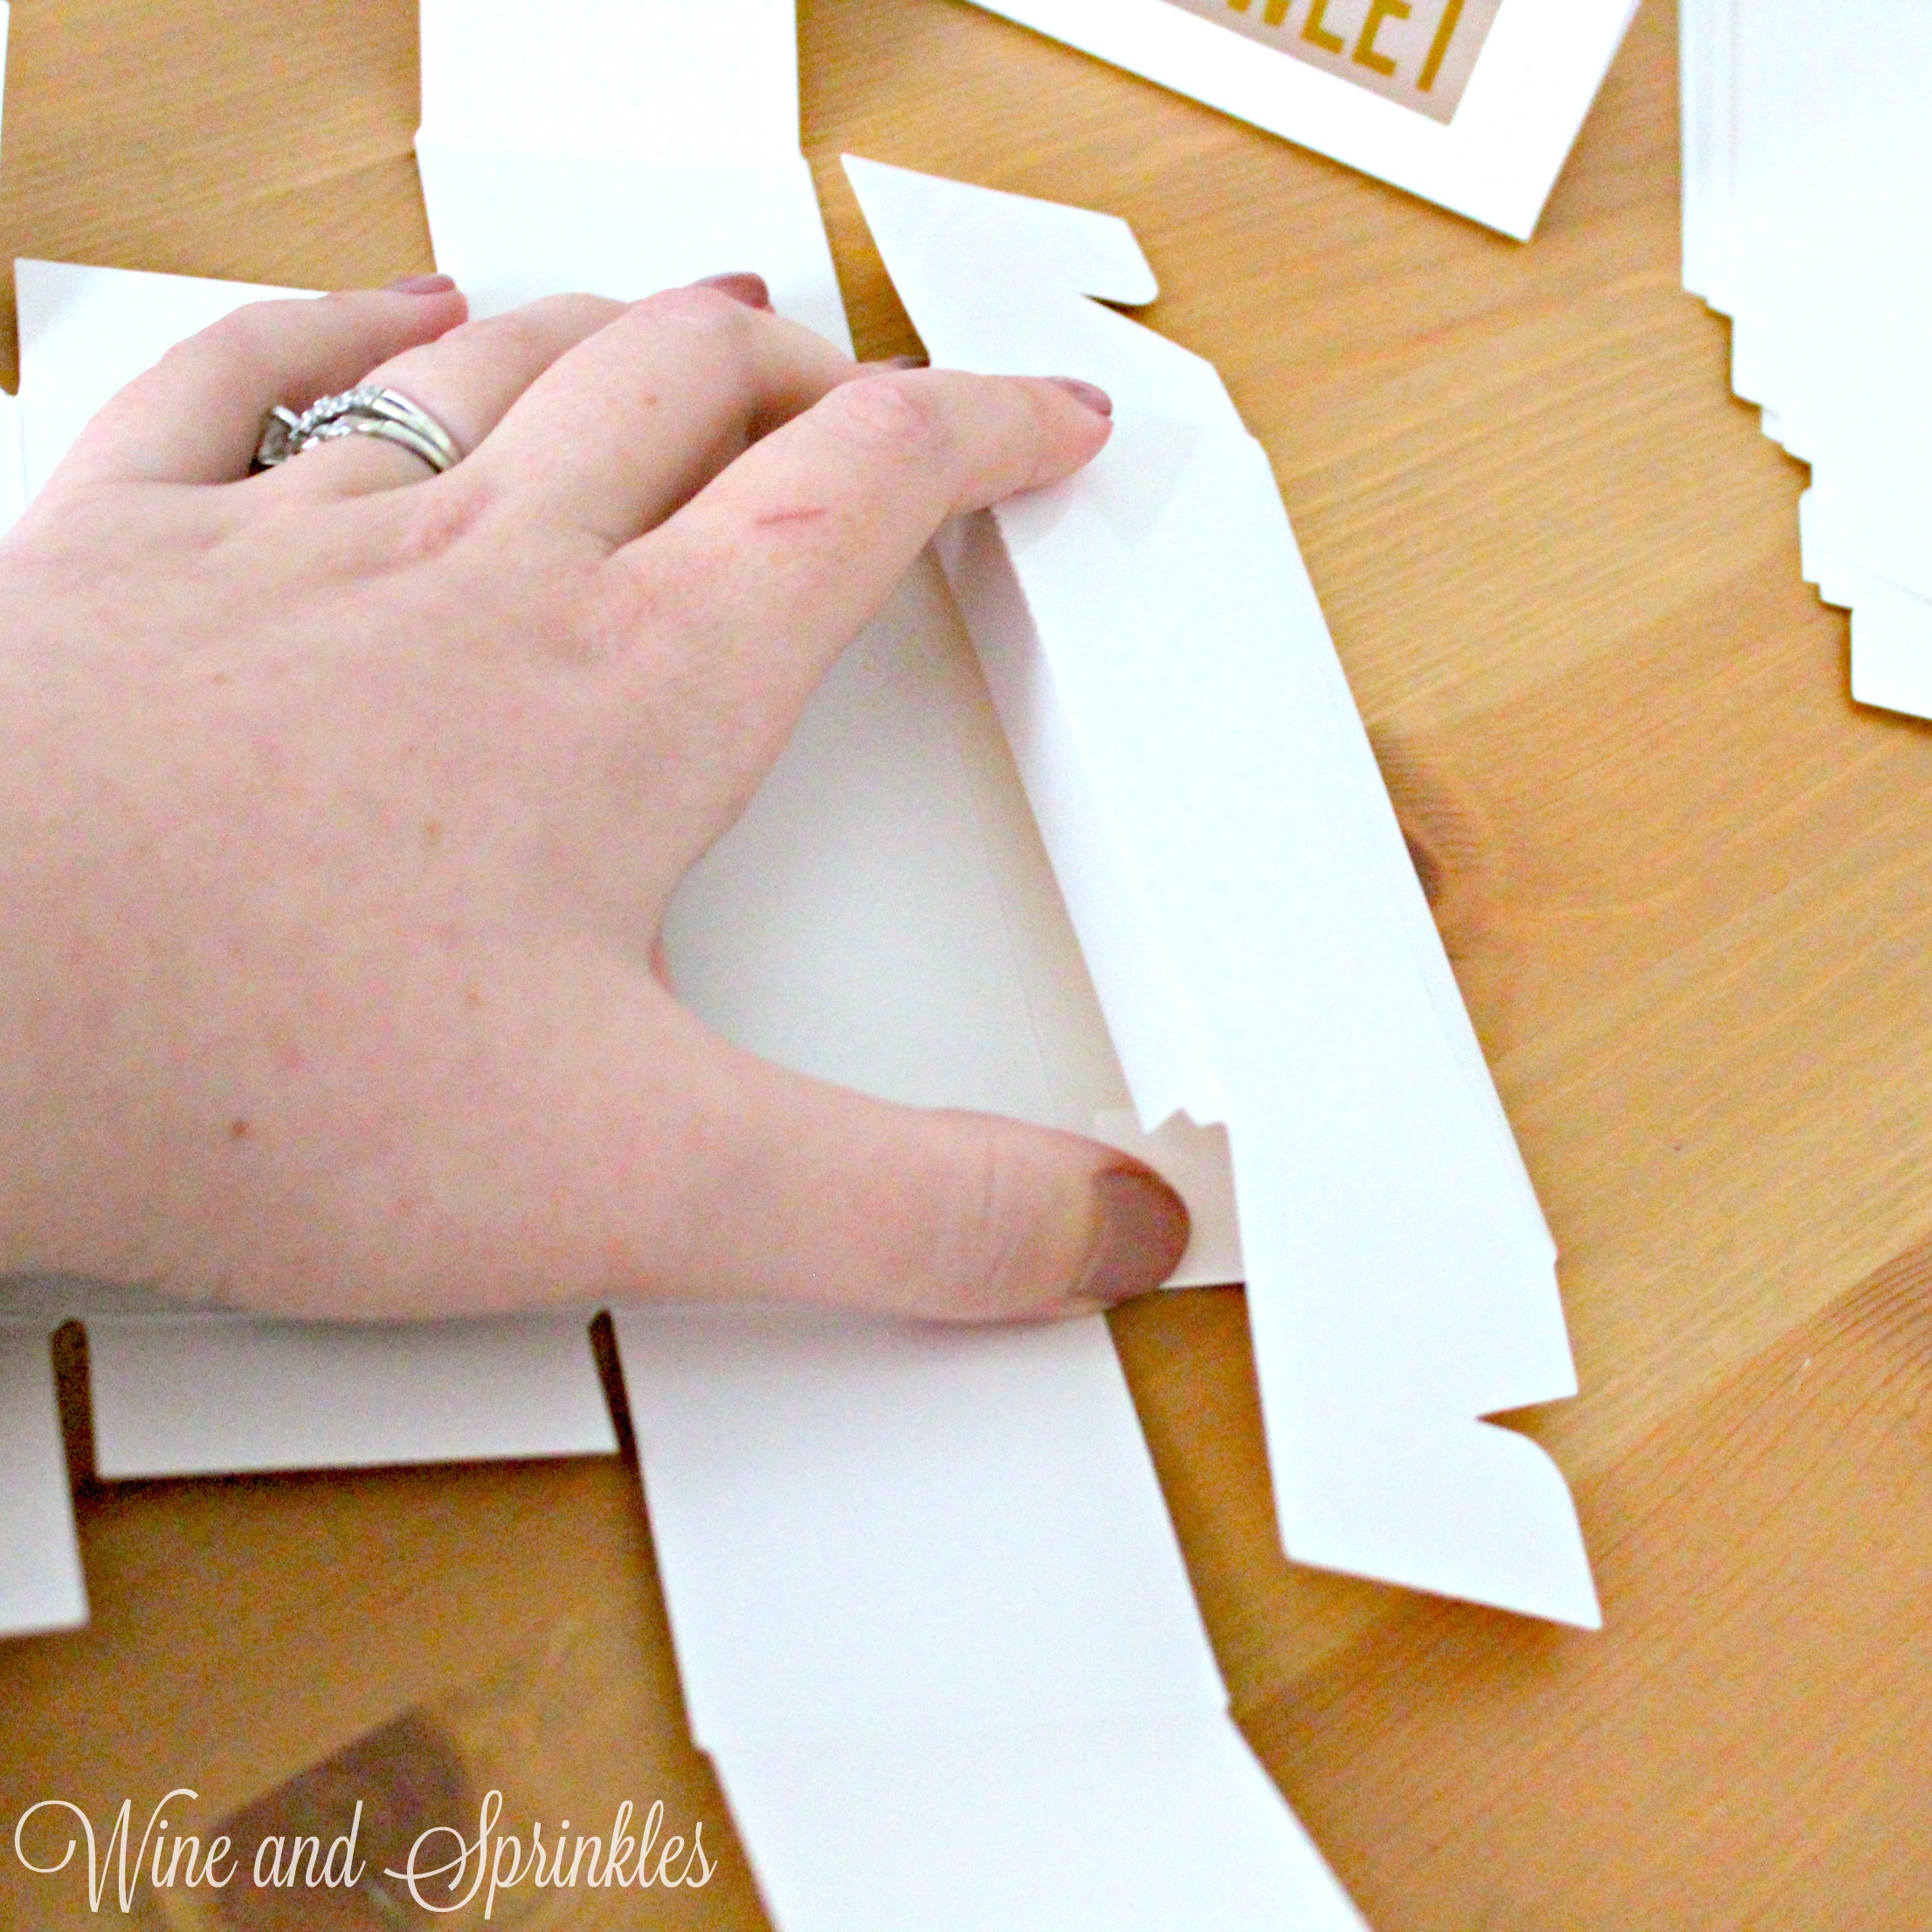
1. Start by folding all of the lines on the box, as shown below. This will make the box easier to bend later and help you see how it goes together.
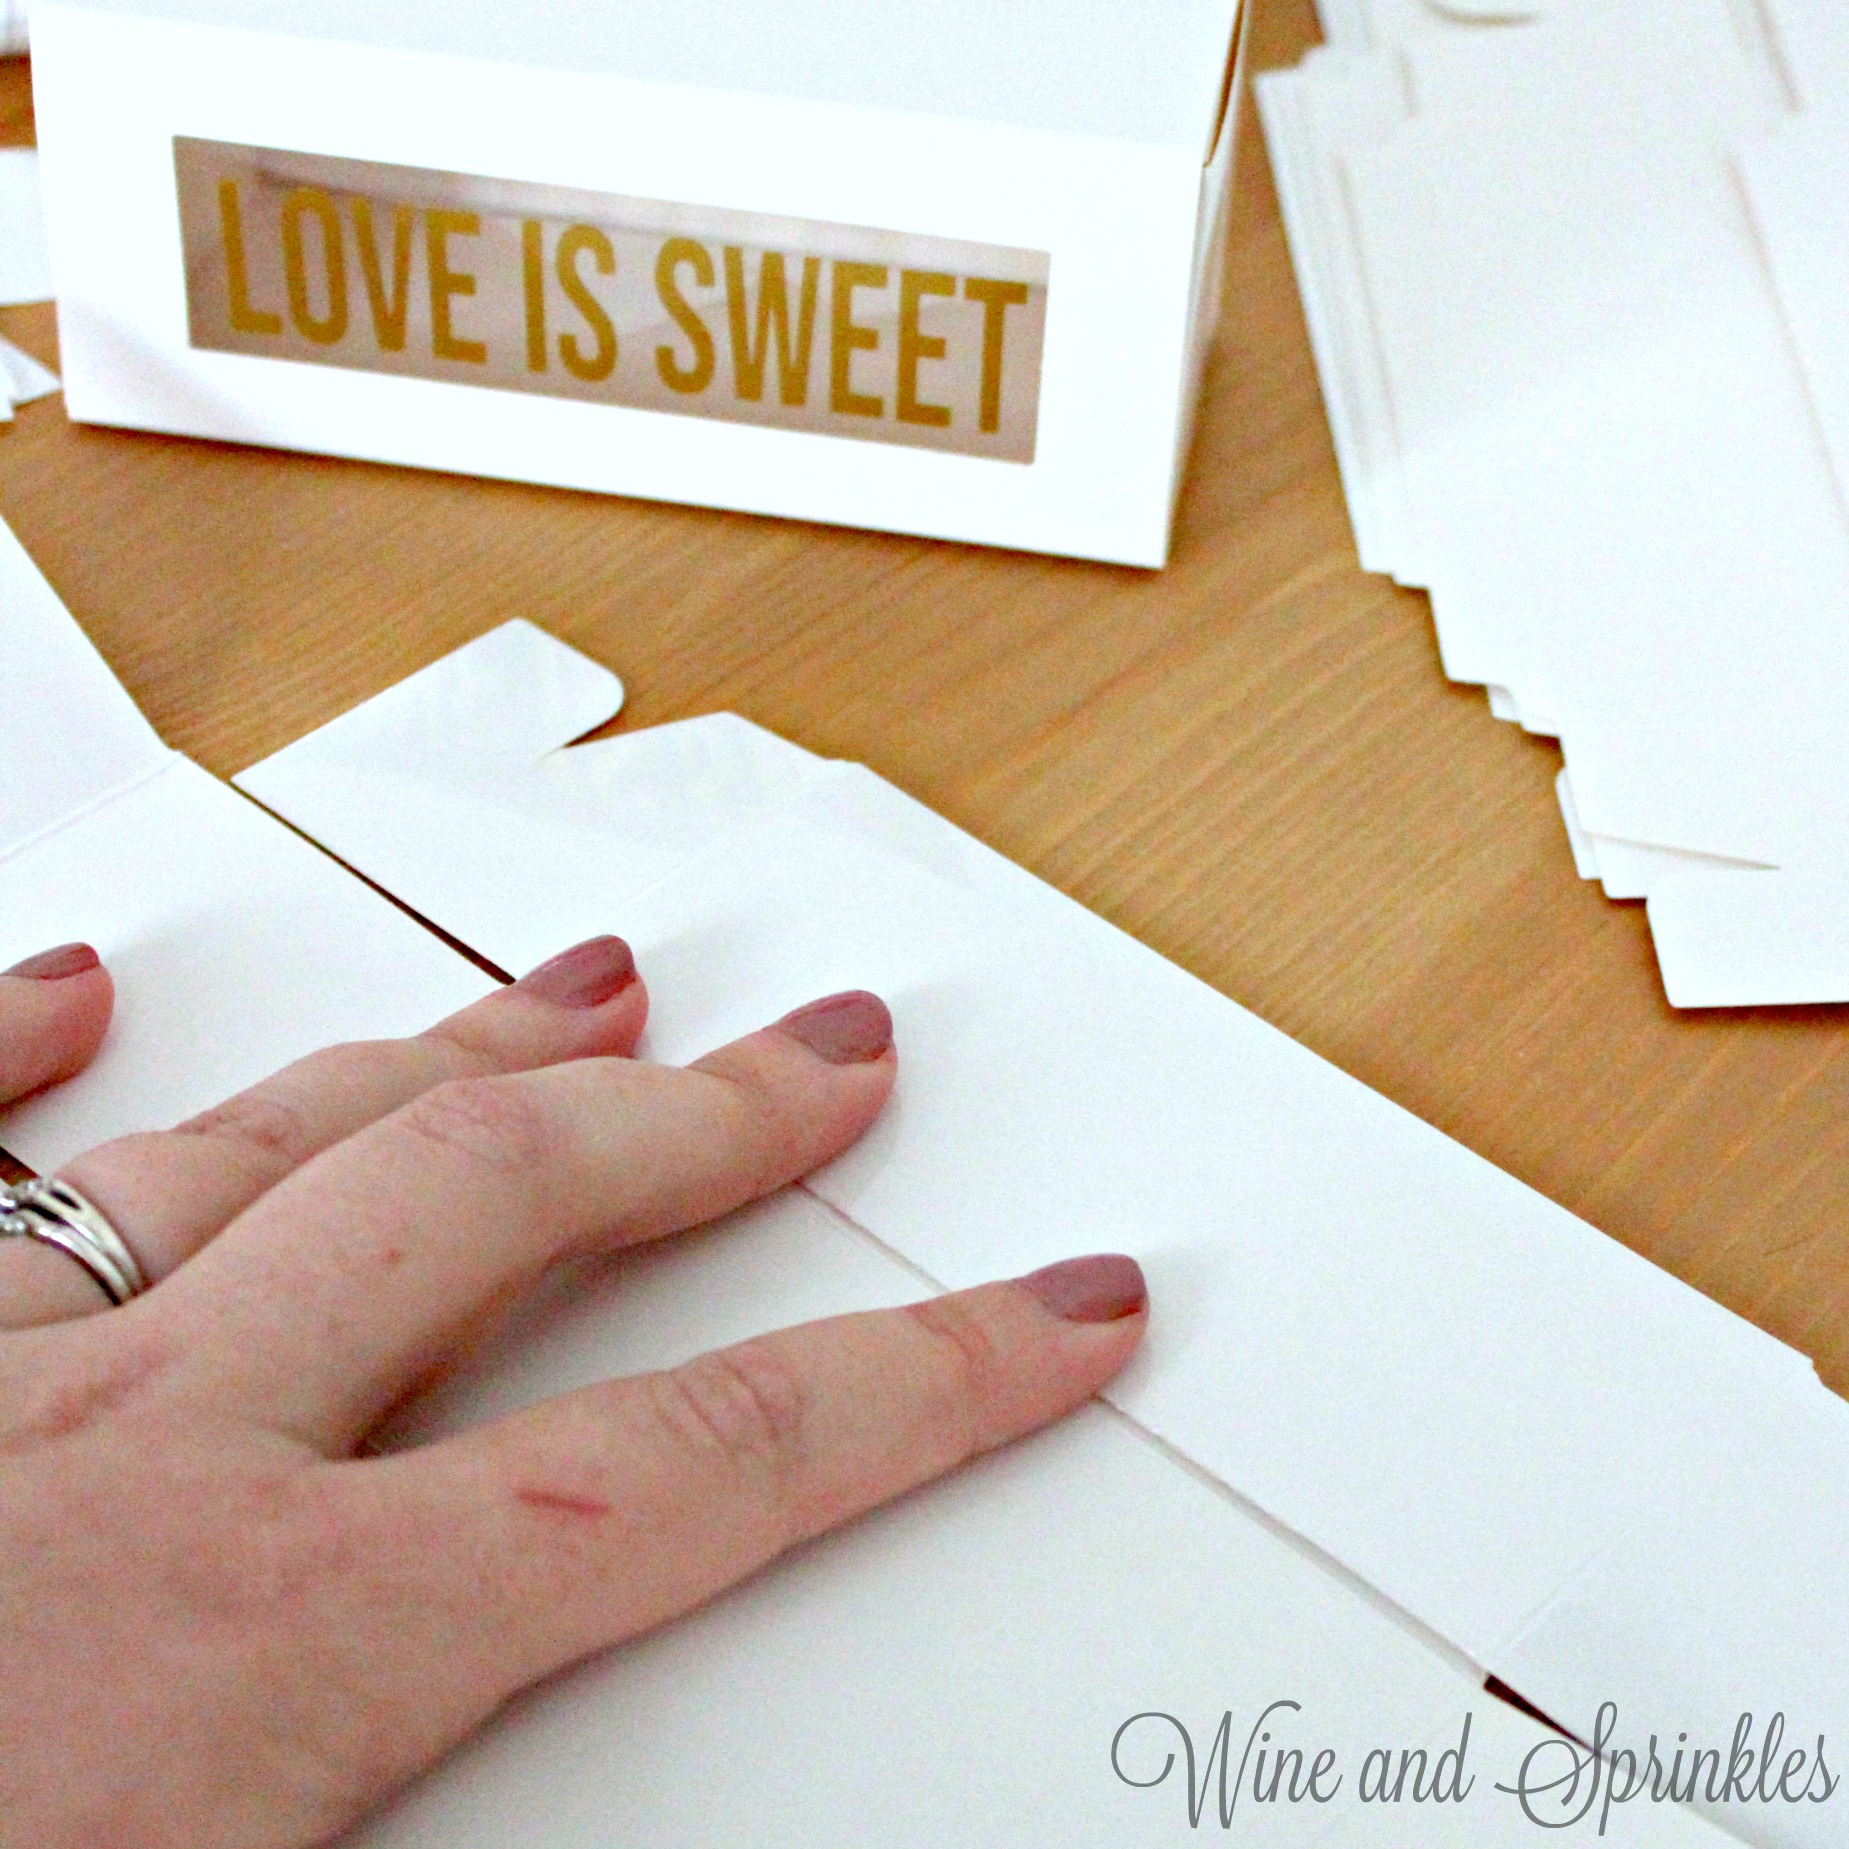
2. Taking the long edge, tuck in the two short middle flaps on the side, then fold over the wall and tuck the edge flap under the wall, forming the lengthwise wall as shown below. Repeat for both lengthwise walls.
3. Taking the end flaps on each of the lengthwise walls, hook them together to form the shorter wall of the box. once they are locked in, fold the last side flap over the wall, tucking the end flap under to complete the short wall of the box.
4. Once the boxes are made, fill them with macaroons, and then slide your sleeves over the cookies to finish the favors. I would recommend making all your sleeves and boxes beforehand, then filling them with their cookies the night before or morning of your event. :)
Be my Bridesmaid Macaron Box Bridesmaid Proposal Boxes
This post contains affiliate links, meaning that if you click on a link I will recieve a small comission. This costs you nothing extra and I only promote products I use and love! You can read our full disclosure here
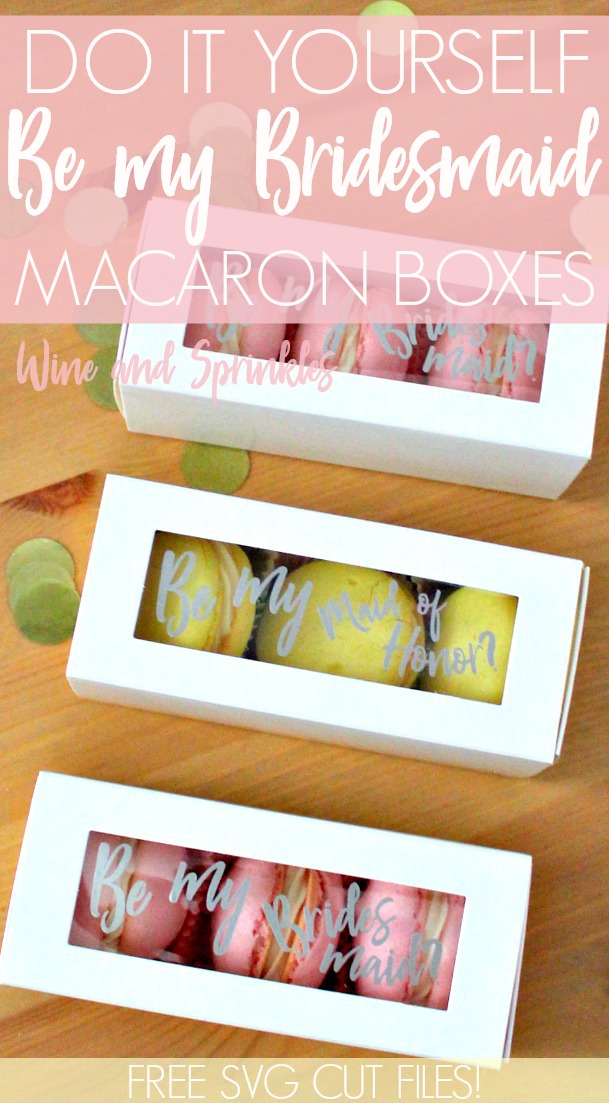
What better way to invite your best girls to be your bridesmaids than with some super tasty macarons! I love the idea of having a brunch or cocktail party to invite them ,and to have these at their seats when they arrive!
Regardless, they are easy to make and great for filling with any treat, and perfect as a proposal on their own or as part of a bridesmaid box!
I chose Oracal 651 Gold and Silver Vinyl for my stickers and had my first successful macaron baking day to fill them! :) My personal favorite color combination was the pink strawberry macarons with the gold lettering!
Supplies:
Macaron Boxes
Transfer Tape
Craft Cutter and Tool Set
Adhesive Mat
Permanent Adhesive Vinyl
Macaron Box Decal Design Files
1. After downloading the cut files, import them into the Cricut Software. After creating a new project, select Upload Image. Select the file you wish to upload and it will automatically take you to the final upload screen, where you can name the file the select Save.
2. Cut the design(s) in your choice of permanent adhesive vinyl with the Vinyl Setting on your Cricut. The SVG Files are sized so that they will automatically cut to the size you see in the photos, but if you want to change the size you can do so in the Cricut Software.
3. Once the designs are cut, weed away the extra vinyl and cut a piece of transfer tape to 1" x 4". Cut away any excess backing from the vinyl design and smooth transfer tape over the design, aligning along the bottom of the text, as shown below. Using the smoother tool, smooth the tape to the vinyl, removing any air bubbles.
4. Remove the transfer tape from the backing, lifting the design from the backing to the transfer tape.
5. Aligning the transfer tape along the bottom edge of the clear window on the sleeve of the box, place the design in the middle of the window. With the tape aligning the bottom, I was able to center it in the window pretty easily and its also decently forgiving if its not exactly right, as long as the bottom is aligned.
6. Smooth the design on the window, using your fingers to smooth each letter onto the plastic.
7. Remove the transfer tape, leaving the design on the sleeve.
With the sleeves complete, next it is time to fold the boxes that will hold the macaroons! It took me a little trial and error to get it right so I will share it here as well, since my boxes didn’t come with instructions. I did my best on the description and took lots of pictures so hopefully it will help you as well if you are having trouble! :)
Box Assembly
Since these boxes are the same as my Love is Sweet Macaron Favor Boxes, I’m using those pictures! :)
1. Start by folding all of the lines on the box, as shown in the photo. This will make the box easier to bend later and help you see how it goes together.
2. Taking the long edge, tuck in the two short middle flaps on the side, then fold over the wall and tuck the edge flap under the wall, forming the lengthwise wall as shown. Repeat for both lengthwise walls.
3. Taking the end flaps on each of the lengthwise walls, hook them together to form the shorter wall of the box. once they are locked in, fold the last side flap over the wall, tucking the end flap under to complete the short wall of the box.
4. Once the boxes are made, fill them with macaroons, and then slide your sleeves over the cookies to finish the favors. I would recommend making all your sleeves and boxes beforehand, then filling them with their cookies the night before or morning of your event. :)
Love is Sweet Macaroon Favor Boxes
This post contains affiliate links, meaning that if you click on a link I will recieve a small comission. This costs you nothing extra and I only promote products I use and love! You can read our full disclosure here
It’s the season of love everyone and nothing says love to me like macaroons! These pretty french cookies are light, sweet, and a perfect classy edible favor!
I ended up finding these adorable Macaroon Favor Boxes on Amazon, then is was super easy to measure the window, design a simple sticker, then cut and stick! I chose Oracal 651 Gold Vinyl and Silver Glitter Vinyl for my stickers and ended up picking up some macaroons for the boxes at the local super market. That being said, if you learn to make your own macaroons not only will you be able to customize the flavors and colors, but also will make them far far cheaper to make! :)
Supplies:
White Macaroon Boxes
Transfer Tape
Craft Cutter and Tool Set
Adhesive Mat
Love is Sweet Design File
1. After downloading the cut files, import them into the Cricut Software. After creating a new project, select Upload Image. Select the file you wish to upload and it will automatically take you to the final upload screen, where you can name the file the select Save.
2. Cut the design(s) in your choice of permanent adhesive vinyl with the Vinyl Setting on your Cricut. The SVG Files are sized so that they will automatically cut to the size you see in the photos, but if you want to change the size you can do so.
3. Once the designs are cut, weed away the extra vinyl and cut a piece of transfer tape to 1" x 4". Cut away any excess backing from the vinyl design and smooth transfer tape over the design, aligning along the bottom of the text, as shown below. Using the smoother tool, smooth the tape to the vinyl, removing any air bubbles.
4. Remove the transfer tape from the backing, lifting the design from the backing to the transfer tape.
5. Aligning the transfer tape along the top edge of the clear window on the sleeve of the box, place the design in the middle of the window. With the tape aligning the top, I was able to center it in the window pretty easily and its also decently forgiving if its not exactly right, as long as the top is aligned.
6. Smooth the design on the window, using your fingers to smooth each letter onto the plastic.
7. Remove the transfer tape, leaving the design on the sleeve.
With the sleeves complete, next it is time to fold the boxes that will hold the macaroons! It took me a little trial and error to get it right so I will share it here as well, since my boxes didn’t come with instructions. I did my best on the description and took lots of pictures so hopefully it will help you as well if you are having trouble! :)
Box Assembly
1. Start by folding all of the lines on the box, as shown below. This will make the box easier to bend later and help you see how it goes together.
2. Taking the long edge, tuck in the two short middle flaps on the side, then fold over the wall and tuck the edge flap under the wall, forming the lengthwise wall as shown below. Repeat for both lengthwise walls.
3. Taking the end flaps on each of the lengthwise walls, hook them together to form the shorter wall of the box. once they are locked in, fold the last side flap over the wall, tucking the end flap under to complete the short wall of the box.
4. Once the boxes are made, fill them with macaroons, and then slide your sleeves over the cookies to finish the favors. I would recommend making all your sleeves and boxes beforehand, then filling them with their cookies the night before or morning of your event. :)
While these boxes are intended for macaroons, they can be filled with any sweets that you like and still work wonderfully for your event, whether its a wedding, bridal shower, or even a Galentines Day Party!
D.I.Y. Loose Tea Favors
This post contains affiliate links, meaning that if you click on a link I will recieve a small comission. This costs you nothing extra and I only promote products I use and love! You can read our full disclosure here
As much as I love teacups and teacup candles as favors, in reality that is just too expensive for everyday shower favors. That’s where these lovely tea tins come in! For a Beauty and the Beast feel, I modified a free piece of rose clipart that reminded me of the stained glass window in the original movie.
Supplies:
Avery 2” Round Labels
Silver Tins
Tea of choice
Tea-rific Labels
1. Fill the tea tins with the tea of your choice. It took around 3 Tbsp of tea per tin to fill it about 2/3 full.
2. Print your labels. I always print a test page of the labels to make sure they line up with your label paper. My printer was a little bit testy about printing them perfectly on the lines but since the rose pattern overlaps the label anyway it didn’t really cause any issues for my labels. :)
3. Lastly, place the label on the lid of the tin and you are done!
Yes this is literally the easiest tutorial ever, making it a great last minute favor your guests will love! I’m already thinking of other fun foods for these tins; mixed nuts, coffee, sprinkles? :) What food would you give away in these cute little tins?
SEE OUR RELATED POSTS HERE:
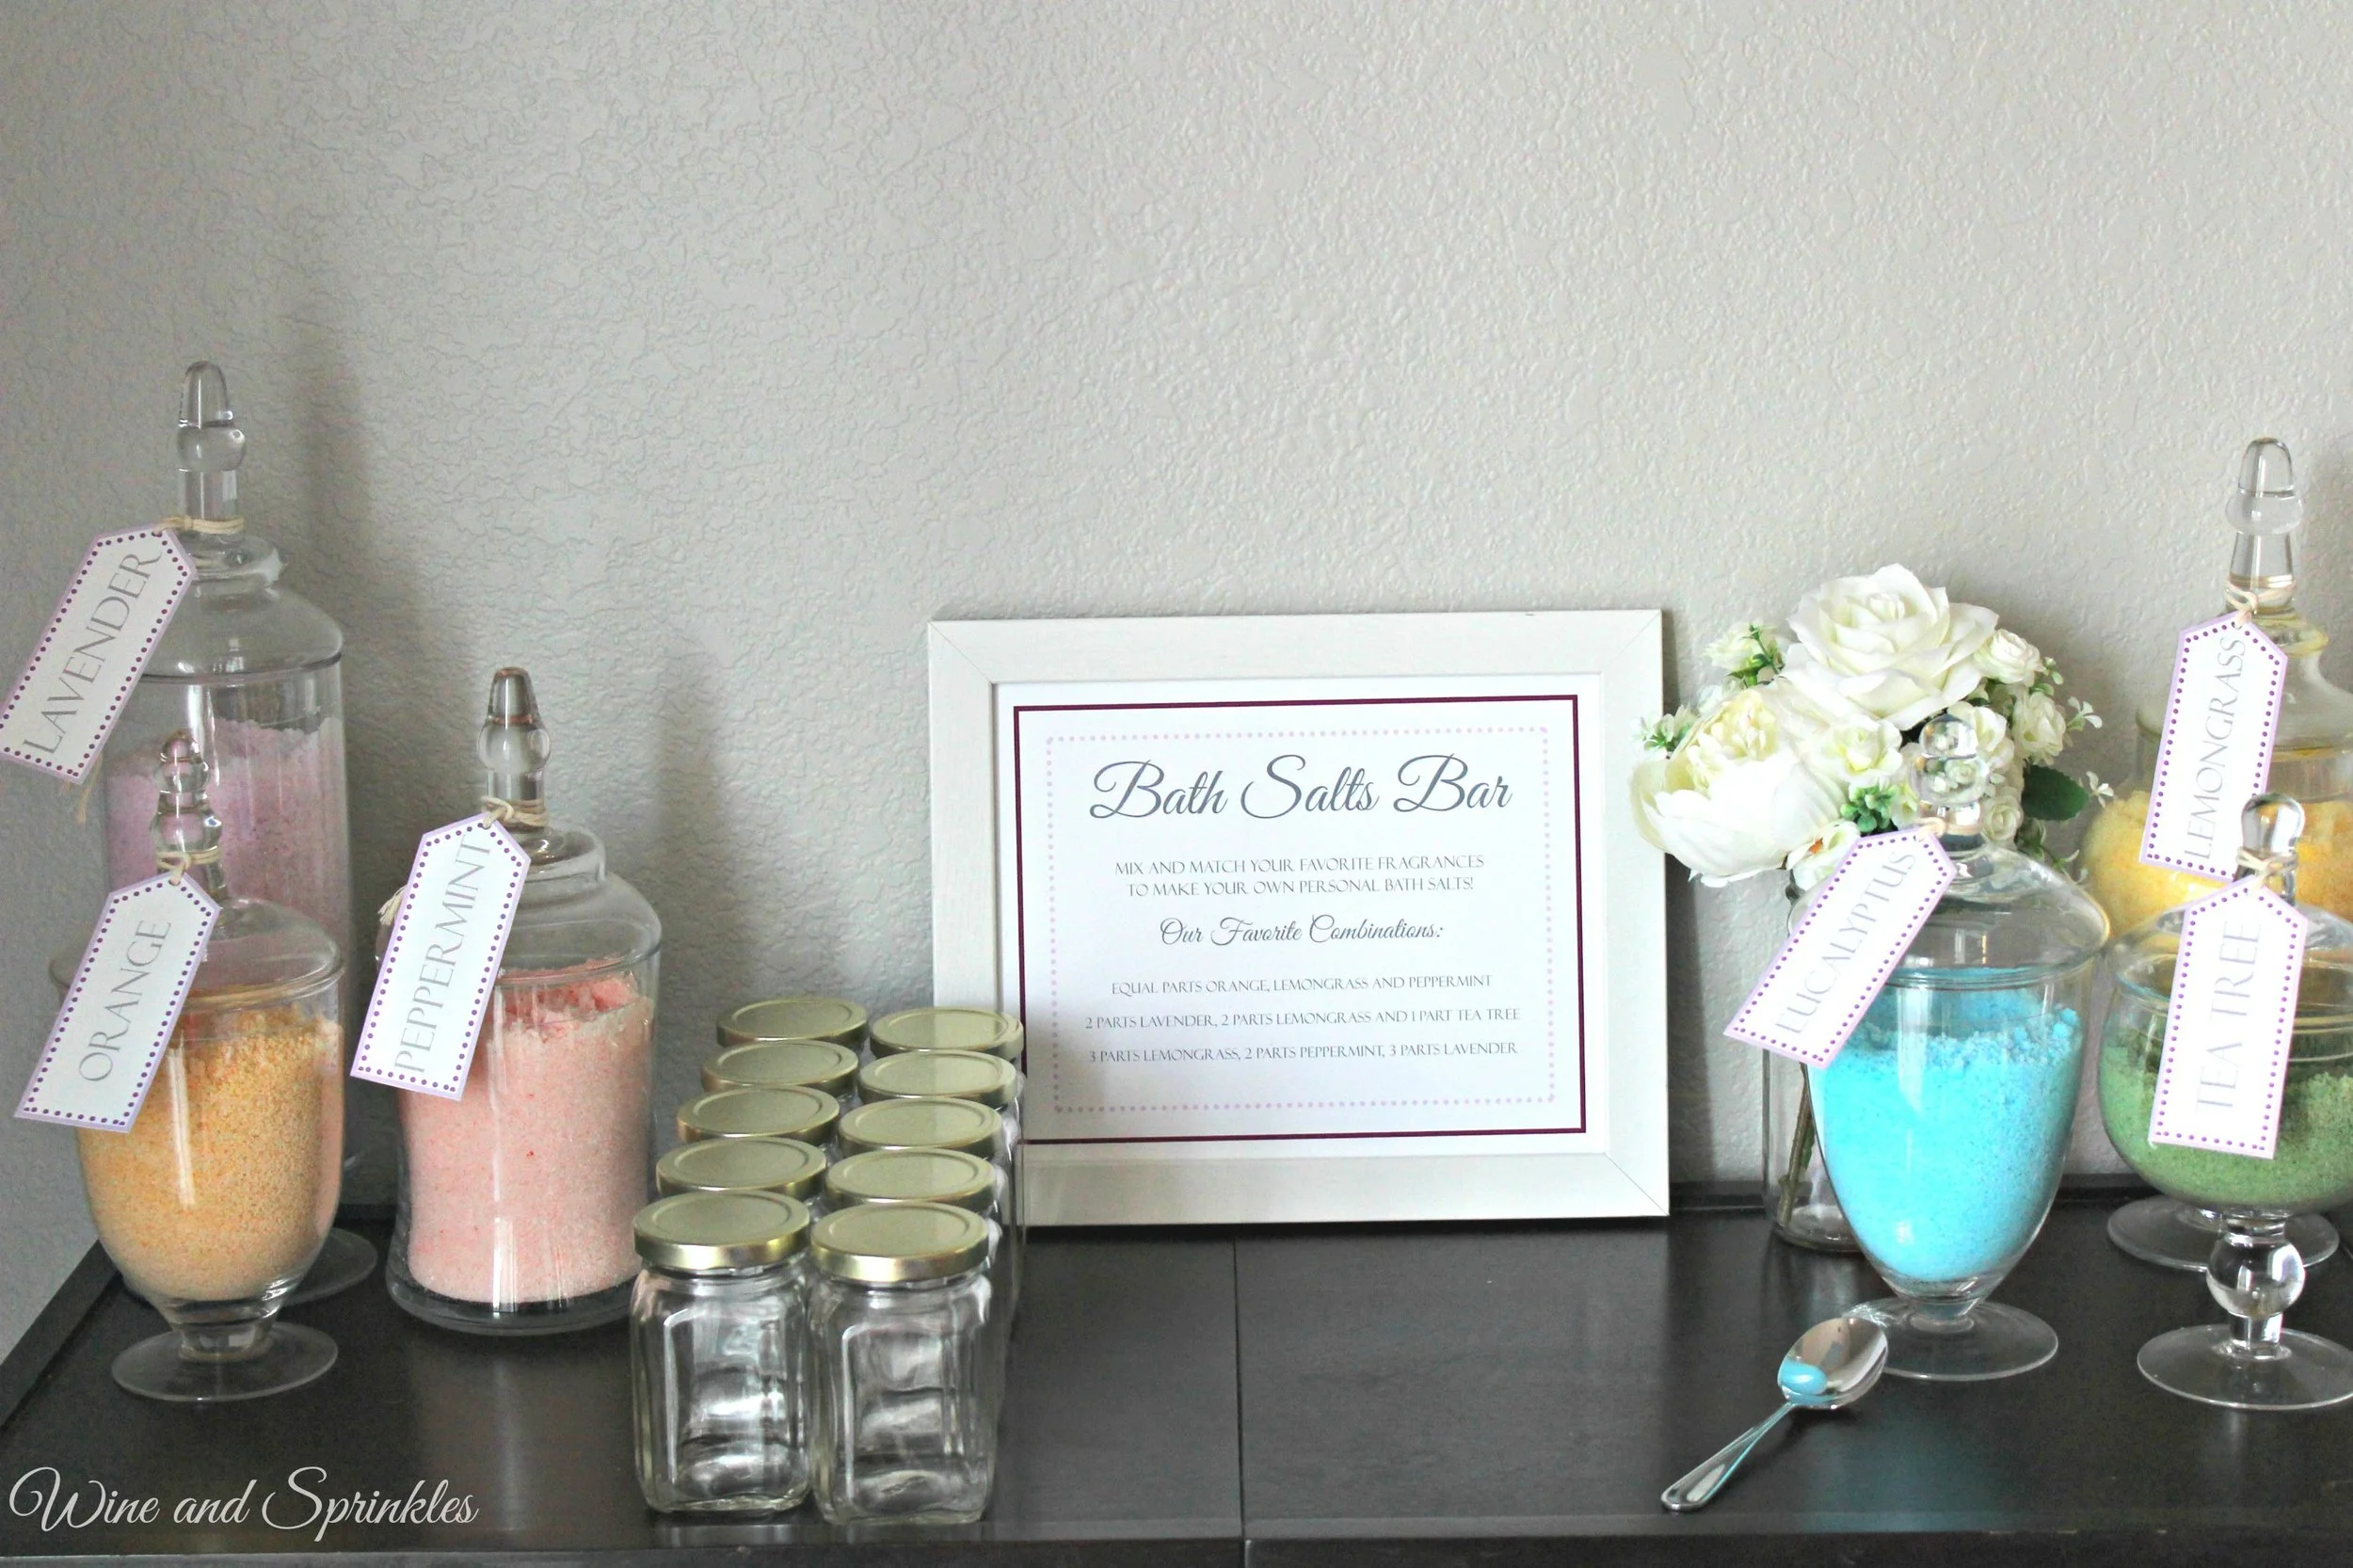
Bath Salts Favor Bar
This post contains affiliate links, meaning that if you click on a link I will recieve a small comission. This costs you nothing extra and I only promote products I use and love! You can read our full disclosure here
I don’t know about you but one of my favorite trends in the wedding industry are food bars; smore’s bars, mashed potato bars, mac and cheese bars, I love them all! With that in mind, I thought to myself, why not do a favor bar?
Favors seem to be falling out of style with budget conscious brides and maids, but I am still a huge fan! I always want my guests to feel valued and thanked for attending and even if it’s just a little something, I think favors are a nice touch of appreciation. That being said, favors don’t have to be crazy expensive to be unique and fun for guests!
For my first favor bar, I went with bath salts! Why? Because you can easily make multiple types and colors with the same set of ingredients, then let your guests mix together their favorite combination and take it home in a cute little jar! Better yet, you can store your extra salts in Tupperware or bags to use yourself.
Supplies:
Baking Soda
Epsom Salt – 5lb Bag
Deep Sea Salt – Fine Grain, 5 lb Bag
Essential Oils
Powdered Dye
Bath Salt Tags
Bath Salts Bar Sign
1. First, start by making the basic bath salt mixture. You will use this same base for all your fragrances and colors. Mix together the following proportions of salts and baking soda:
4 cups Deep Sea Salt
5 cups Espom Salt
1 cup Baking Soda
Each 5 lb bag contains approximately 10 cups of salt so you will be able to make almost 20 cups of Bath Salts from one set of bags. I mixed my salts as two batches of the above recipe because I didn’t have a bowl big enough for 20 cups!
2. Now, decide what containers you will display your bath salts in. I personally adore apothecary jars and have used my two sets (linked here and here :) ) for almost every party I have had. They give such a great finishing touch to any display and you can use them again and again! Whatever you decide to display your salts in, record how many cups of salts they can hold. For my jars, they hold anywhere between 2 – 4 cups of bath salts.
3. Once you know how much each jar holds, you can start mixing in coloring and fragrance. For my salts, I used the following fragrances and colors.
Yellow – Lemongrass
Blue – Eucalyptus
Orange – Sweet Orange
Green – Tea Tree
Purple – Lavender
Pink – Peppermint
Measure the desired amount of premixed bath salts into a separate bowl. Add ¼ tsp. of color and 5-10 drops of oil depending on your preference. Whisk in oils and color until fully combined, then transfer the mixture into its associated jar. Repeat with the additional colors until you have all the fragrances you want. The great thing about the essential oils starter set is that you have a popular fragrance assortment that go well with the powdered colors!
4. Now the final thing to do is to make sure that your guests understand what they need to do, that’s where the signs and tags come in! If you are using the fragrances and colors I have recommended, you can use the free printables available on this post! Punch a hole in each bath salts tag and tie around your apothecary jars and simply place the bath salts bar sign into an 8 x 10 frame. Make sure to place out some spoons to scoop salts and you are done!
Now I can’t take credit for the combinations on the sign, they came straight from the essential oils set I bought. But, I love what they came up with! I use the dyes and essential oils over many projects; including candles, soaps, bath bombs, and salts. You will see with my Bath Salts Bar I provided 6 oz jars to be filled and taken home, making almost 30 favors if each jar got completely filled!
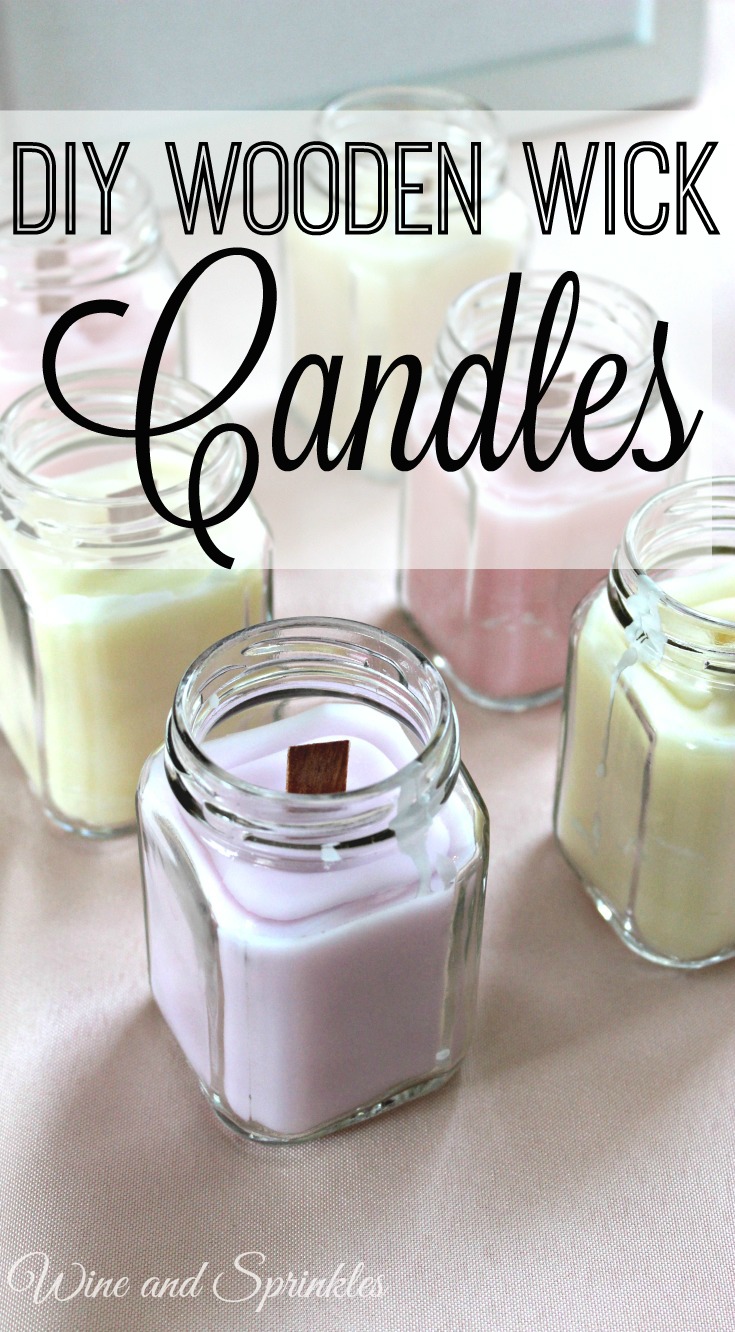
D.I.Y. Wooden Wick Candles
This post contains affiliate links, meaning that if you click on a link I will recieve a small comission. This costs you nothing extra and I only promote products I use and love! You can read our full disclosure here
These lovely crackling candles first came to be based on my own bridal shower. One of my friends won one as a prize and absolutely loved it! When it finally burned out a couple weeks ago, I went looking for a way to replace it as her birthday present. Luckily, I had the thought to check for the wooden wicks first!
I love these wooden wicks compared to the regular ones, where you can achieve the comfort of a crackling fire with a little candle. I didn’t realize it would be so easy to make them myself, or that amazon would have had such an assortment to choose from (last time I doubt that Amazon doesn't have everything under the sun).
Now, I have a wonderful assortment of these candles which were cheap to make and so nice to have! I would highly recommend making them if you have candle stubs at home; I used the ends of my wedding candles for them and was able to make a bunch of them in both leftover favor jars and teacups as prizes for upcoming showers and gifts for my friends! These also work wonderfully for Bridal Shower favors, Wedding Favors, or Baby Shower Favors!
Some things to note on this project: for your candle making supplies, you need a pouring pot or an old pot you don’t care about to melt the wax. I made the unfortunate choice of using one of my cooking pots with an old measuring cup and it took me a good couple hours to get all the wax remnants out. Seeing as I could’ve bought an actual candle pouring pot for a little over $10, it would’ve been a far better choice and I wouldn’t have been spilling wax all over the place!
Supplies:
Wooden Candle Wicks
6 oz Jars with Lids
Candle Wax*
Candle Pouring Pot
Powdered Candle Dye
Essential Oils for Scent
*I used leftover candle stubs, but the wax linked here will make about 26 -6oz candles
1. Melt wax on low heat in your pot. If, like me, you are using candle stubs, remove the wicks from the old candles once the wax is completely melted using either tongs or a fork.
2. For these candles, the full wax wick is far too long. Cut the wicks in half with a pair of scissors, then remove the candle wax from heat and soak them in the wax for 10 minutes. Soaking these wicks is VERY IMPORTANT, they are not like the standard wicks that are already coated in wax and not soaking them will lead to the candles not staying lit.
3. Once wicks have been soaked, remove them with tongs or a fork. Once they are cool enough to handle (I was able to touch them immediately) insert them into the metal holder stands included and let dry.
4. Now, attach the wicks to the bottom of your jars by dipping the metal holder into the melted wax, then position at the bottom of the jar.
5. Let the wax cool for a couple more minutes, then add color and fragrance of your choice. The ones I have recommended are great for candles, bath bombs, soaps, and bath salts, so you can get a lot of use out of them! I made pastel pink, purple, and yellow candles that were scented as peppermint-lemon, lavender-lemon, and rosemary-lemon (I know you can't tell that I like lemon).
6. Pour cooled (but still liquid) was into the jars. Reserve about 25% of your wax to remelt and top off your candles if a divot is created in the middle due to the wax cooling. The cooler the wax is, the less of a divot will form. Some of mine with the cool wax needed no additional wax to fill in, while the ones where I started with hot wax needed a lot of extra to make them look nice!
7. Once candles are cooled and solidified, remelt the excess wax and fill in any divots that were caused during the first pour. Now you have a lovely set of candles for your home or favors for your next party!
The crackling of these candles makes me want to make a slew of them for a fall or winter wedding, just with different colors and scents. :) What would you make these cute little candles for?
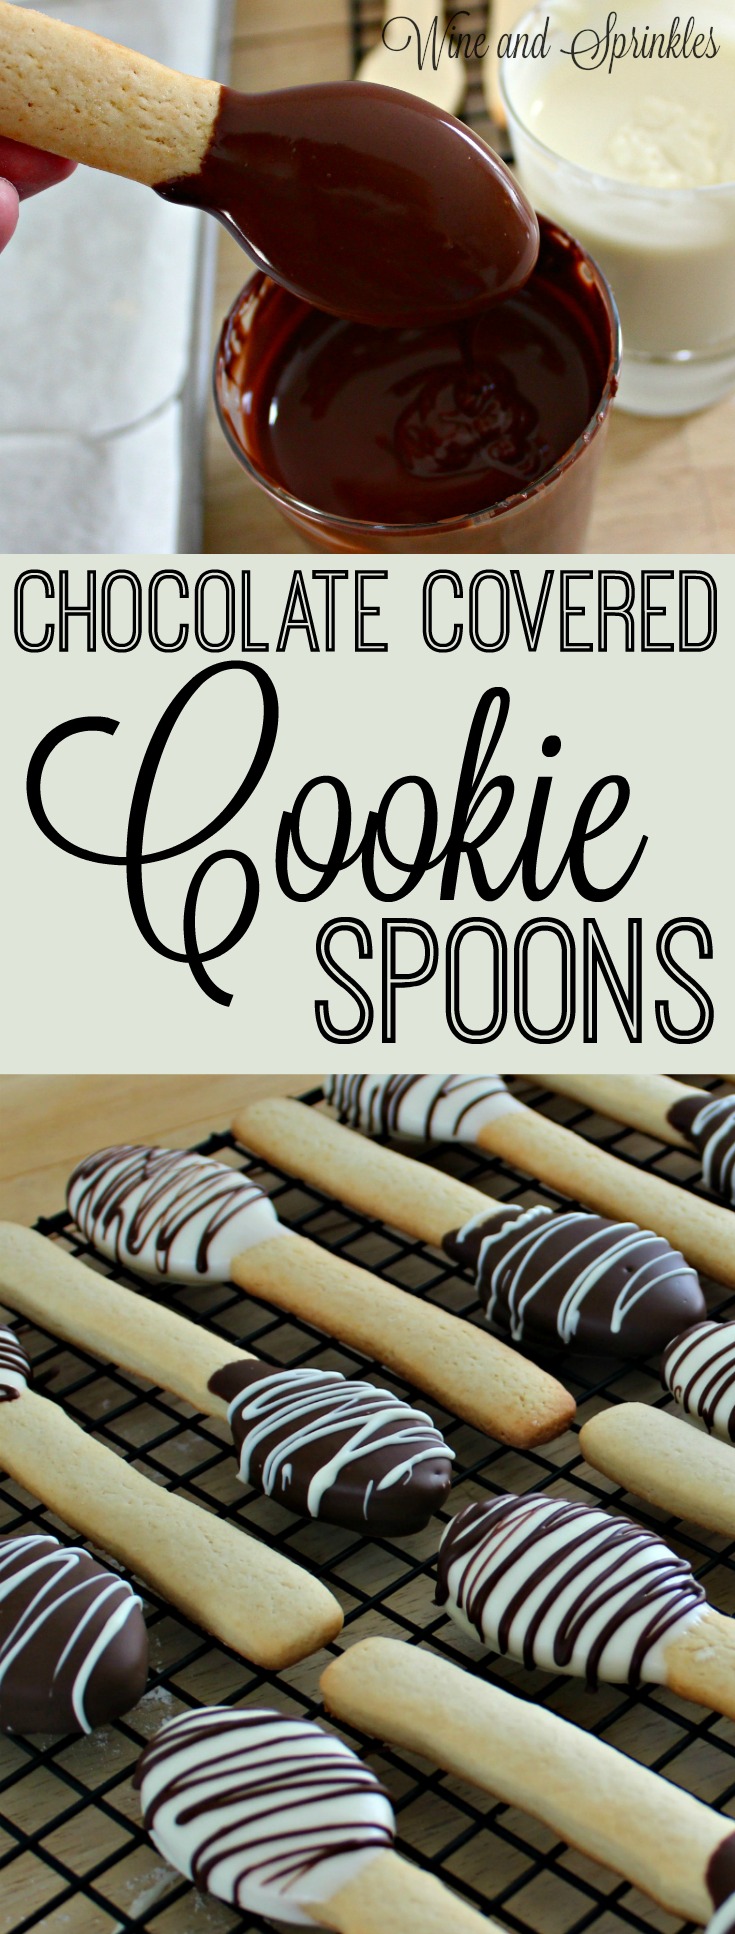
Chocolate Dipped Cookie Spoons
This post contains affiliate links, meaning that if you click on a link I will recieve a small comission. This costs you nothing extra and I only promote products I use and love! You can read our full disclosure here
These adorable cookie spoons are something that I was planning on doing for my wedding out of town guest bags; but I never got around to making them! They go perfect with a cup of cocoa and are a wonderful addition to a coffee bar. :) The best part is that they are quite cheap to make, 120 spoons for about $50 if you have to buy all the ingredients.
Supplies:
Spoon Shaped Cookie Cutter
2 – 10 oz White Candy Melts
2 – 10 oz Chocolate Candy Melts
Sugar Cookie Dough (Here is my recipe)
1. Prepare the Sugar Cookie dough according to the recipe you plan to use. For the recipe I used, it will make around 120 spoons if you use all the dough. In general you want the dough to hold its shape and not flatten out, so try not to use the store bought stuff (If you do, add a little flour into the dough before rolling it out).
2. Sprinkle flour on your work surface and roll the dough out to a little over ¼” and cut out spoons with the cookie cutter. Transfer to a cookie sheet and bake for 10-12 minutes. Try to have your cookies come out on the crispier side; that will help them keep their strength for being dipped into coffee.
3. Once your cookies are cooled, melt the chocolate melts according to the package. Dip the end of each spoon into the chocolate then lay on parchment paper to cool. I put my candy melts in glasses so that it made dipping the cookies easier and made half of my cookies white and half dark chocolate.
4. Once the chocolate has hardened, use a spoon to drizzle the extra chocolate over the spoons, and you’re done!
These cookies are easy to make into cheap favors by simply putting them in cellophane bags and are the perfect addition to a welcome bag for a winter wedding! Leave any questions you have in the comments!
DIY Personalized Wedding Matches
This post contains affiliate links, meaning that if you click on a link I will recieve a small comission. This costs you nothing extra and I only promote products I use and love! You can read our full disclosure here
One of my favorite ideas that came into play with our wedding was the Cigar Bar I designed for my husband and his fraternity brothers. It gave the guys a fun "manly" thing to do during the wedding and everyone told us how much they liked it! Now for me, no cigar bar is complete without personalized matches, and no better time to personalize everything than for your wedding! As I searched, I couldn't seem to find anything quite right so I decided to design my own! It was surprisingly easy and I love the way they turned out!
Note: This post contains affiliate links, which means that if you click on one of the product links and choose to purchase, I will receive a small commission. This does not affect your price in any way and I only promote products I use and love! :)
Supplies:
Full Sheet Adhesive labels (I used Avery 5156)
1. Using the matchbook template, start by putting your own information into the text boxes. The font I used for our names and location is called Baroque Script, so if you want it to look exactly like these matches make sure to have the font downloaded beforehand!
2. Print out the matches and cut them out with scissors. Next, line up the top of the matchbook and the sticker. Make sure that the sandpaper strip is on the side that won't be covered by the sticker.
3. As shown above, adhere the sticker starting at the top, then smoothing around the entire matchbook. Below you see a finished matchbook.
This project really added a special touch to our big day and as you can see its quite easy to do! After the initial measuring and designing of the template it only took about two hours to cut and make 100 matchbooks! Stay tuned for more fun wedding crafts!